How to Change Recessed Lighting to Pendant: Step-by-Step Guide
Are you staring up at your ceiling, wishing your recessed lighting could offer a bit more style? You’re not alone.
Many homeowners feel the same way, looking for ways to inject personality into their spaces without undergoing a major renovation. The good news? Switching from recessed lighting to pendant lights is simpler than you might think. By making this change, you can transform the ambiance of any room, adding warmth and a touch of elegance.
We’ll guide you through the process, offering easy-to-follow steps and tips that will help you achieve that perfect look. Ready to give your room a chic makeover? Let’s dive in and explore how you can effortlessly change your recessed lighting to stylish pendant fixtures.

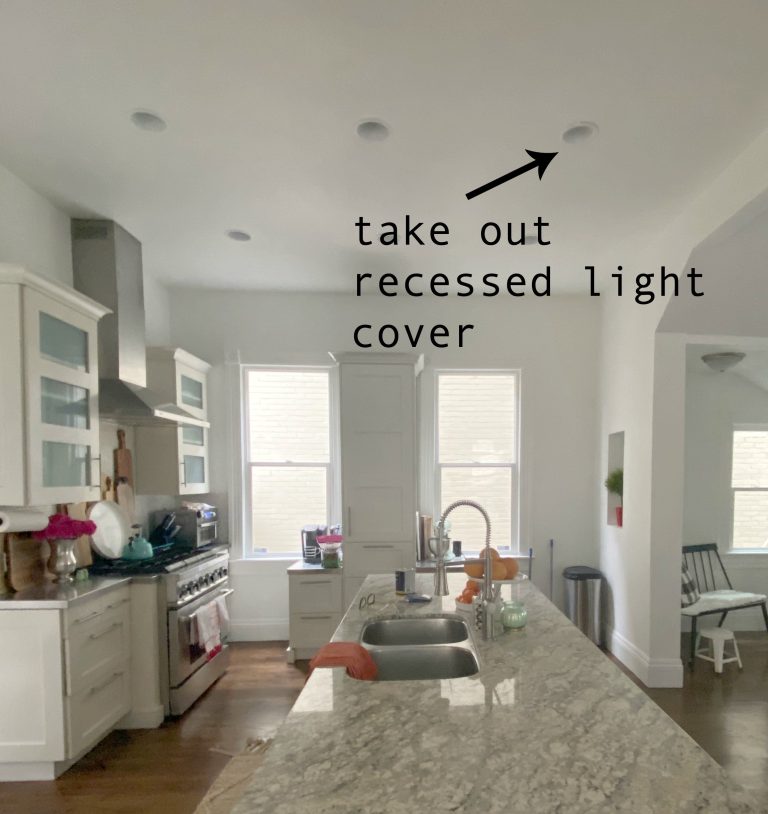
Credit: prettyhandygirl.com
Tools And Materials Needed
Switching recessed lighting to pendant lights requires a few key tools and materials. Gather a screwdriver, wire strippers, and the new pendant light kit. Ensure you have a ladder and a voltage tester for safety.
Changing recessed lighting to pendant lighting can dramatically transform the ambiance of your space, bringing an updated style and personalized touch to any room. Before you begin this project, it’s essential to gather all necessary tools and materials. Having everything on hand will streamline the process and help prevent unnecessary delays. Let’s dive into what you’ll need for a seamless transition from recessed to pendant lighting.Tools You Will Need
Here’s a list of tools to ensure a smooth installation. – Screwdriver: You’ll need both flathead and Phillips screwdrivers to remove existing fixtures and secure new ones. – Pliers: Essential for gripping and twisting wires, especially if you need to splice them. – Wire Strippers: These will help you safely remove insulation from the wire ends. They make connections cleaner and ensure a better electrical contact. – Tape Measure: Use this to measure the correct hanging length for your pendant light. An awkward length could disrupt your room’s balance. – Voltage Tester: Safety first! Verify that the power is off before starting your work. A voltage tester will be your best friend here.Materials You Will Need
Besides tools, you’ll need a few key materials. – Pendant Light Kit: Choose a style that complements your decor. Kits often come with the necessary mounting hardware. – Wire Connectors: These make the job of connecting wires secure and safe. They come in various sizes, so make sure to get the right ones for your wires. – Mounting Bracket: Most kits include this, but double-check. It provides support to hold your new pendant fixture in place. – Ceiling Canopy: This covers the wiring and connects the fixture to the ceiling. Match the canopy finish with your pendant light for a cohesive look.Safety Equipment
Never underestimate the importance of safety. – Gloves: Protect your hands from sharp edges and electrical components. – Safety Goggles: Eye protection is crucial, especially when working above your head where dust and debris could fall.Additional Tips
Consider the height of your ceiling and the length of your pendant light. A pendant too low can obstruct views, while one too high might not provide adequate lighting. Are you confident in handling electrical work? If not, it may be wise to consult or hire a professional. Your safety and the safety of your home are always a priority. Taking the time to gather these tools and materials will make the project smoother and more enjoyable. With a little preparation and the right tools, you can achieve a beautifully lit space that’s both functional and stylish. What kind of pendant light are you considering for your room?Safety Precautions
Embarking on the journey to transform your recessed lighting into pendant fixtures can be an exciting home improvement project. However, amid the thrill of revitalizing your space, safety must take center stage. Changing light fixtures involves electrical work, which demands caution and preparation to ensure your safety and the integrity of your home’s wiring.
Disconnect Power Source
First and foremost, always disconnect the power source. This step is crucial to prevent electrical shocks or fires. Head to your circuit breaker and turn off the power to the light fixture you’re working on.
If you’re unsure which breaker controls the lighting, switch off the main power for safety. Use a voltage tester to double-check that no electricity is flowing.
Use The Right Tools
Having the correct tools can make a world of difference. Use insulated tools to reduce the risk of electric shock. A screwdriver with a rubber handle and wire cutters designed for electrical work are essential.
Consider wearing safety goggles to protect your eyes from any debris or accidental sparks. This small precaution can save you from unnecessary harm.
Check Fixture Weight Limits
Before installing your pendant light, confirm that your ceiling can support its weight. Recessed lighting fixtures are often lighter than pendant lights.
Check the manufacturer’s specifications for weight limits and use appropriate anchors if needed. You wouldn’t want your newly installed light to come crashing down unexpectedly.
Ensure Proper Wiring
Proper wiring is vital to prevent electrical hazards. Ensure that the wires are securely connected and insulated. Loose connections can lead to shorts or fire risks.
If you’re not confident in your wiring skills, it might be wise to consult a professional. A small error can lead to significant consequences, so don’t hesitate to seek help.
Test The Installation
Once you’ve completed the installation, test your work. Turn the power back on and check that the pendant light functions correctly. Look for flickering lights or unusual sounds.
Ask yourself: Does everything look and work as expected? Observing these details can prevent potential issues down the line.
By adhering to these safety precautions, you ensure that your lighting upgrade is both successful and secure. Have you ever had a project go awry because of overlooked safety measures? Share your experiences or questions in the comments below!
Turning Off Power
Switch off the power to ensure safety. Safely replace recessed lighting with pendant fixtures for a fresh look. Follow instructions and use the right tools for a smooth transition.
Switching from recessed lighting to a pendant can completely transform your space, providing a modern touch and a focal point for your room. However, before you dive into this project, it’s crucial to ensure your safety by turning off the power. This step is not just a precaution; it’s a necessary action to prevent accidents. Let’s look at how you can do this properly and safely.Identifying The Right Circuit Breaker
First, you need to locate the circuit breaker panel in your home. Typically found in basements, garages, or utility rooms, this panel controls the flow of electricity to various parts of your house. Look for a label or a diagram on the panel door indicating which breaker corresponds to the lighting in the room where you’ll be working. If it’s not labeled, consider testing each breaker to find the right one by turning it off and checking which lights go out.Testing The Power
Once you’ve switched off the suspected breaker, confirm that the power is indeed off. You can do this by attempting to turn on the recessed light; if it doesn’t light up, you’ve hit the right switch. For added safety, use a voltage tester or a multimeter to check the wires. This ensures no electricity is flowing and minimizes risk of shock.Using Safety Gear
Even with the power off, safety gear is essential. Use insulated gloves and wear rubber-soled shoes to further protect against any unforeseen electrical issues. These small precautions can make a big difference in your safety. Have you ever experienced a minor electric shock while working on home projects? It’s a stark reminder of why these measures are important.Double-check Before Proceeding
Before moving on to installing your pendant light, take a moment to double-check everything. Ensure the breaker is off, test the power again, and make sure you have your safety gear on. This might seem excessive, but it’s always better to be safe than sorry. Imagine the inconvenience of having to call an electrician because of a simple oversight. Taking these steps ensures not only your safety but also a smooth transition from recessed lighting to a stylish pendant that can redefine your space. Are you ready to see the impact a pendant light can make? Let’s move to the installation phase and bring a fresh glow to your room!Removing The Recessed Light
Transforming your space with pendant lighting can significantly enhance its ambiance, but first, you need to bid farewell to your recessed lights. Removing recessed lighting might sound daunting, but with a little patience and a few tools, you can accomplish it with ease. This part of the process is straightforward, and once you master it, you’re halfway to achieving that chic, modern look.
Detaching The Trim
Start by detaching the trim around your recessed light. Gently remove it by pulling it down. You might hear a pop as the springs release from the housing. This is normal and indicates you’re on the right track.
Sometimes, the trim might resist a little. Just remember my experience when I thought it was stuck forever. A little jiggle and a strategic pull did the trick.
Once the trim is off, you’ll have clear access to the bulb. You’re one step closer to hanging that beautiful pendant light you’ve been eyeing.
Unscrewing The Bulb
With the trim out of the way, it’s time to unscrew the bulb. Twist it counter-clockwise. If it feels tight, use a gentle hand; you don’t want to break the bulb.
Remember, safety first. Ensure the power is off before you start. A friend once ignored this advice and had a shocking experience—literally!
As you unscrew, think about the design possibilities. What pendant light style will best complement your space? The choice is yours, and it’s exciting to envision the transformation.
Removing recessed lighting is just the beginning of your lighting adventure. As you progress, keep the end goal in sight. What feeling do you want your space to evoke? Your choice of pendant light can make all the difference.
Installing The Pendant Light Adapter
Transforming your recessed lighting into pendant lighting can instantly elevate the style of your space. The key step in this transformation is installing the pendant light adapter. This simple yet effective device allows you to swap out your recessed light for a pendant fixture without major renovations. Let’s dive into the process, focusing first on choosing the right adapter and then securing it properly.
Choosing The Right Adapter
The journey begins with selecting the perfect pendant light adapter. You’ll find a variety of options, each designed to fit different sizes and types of recessed lighting cans. Make sure you measure the diameter of your existing recessed light to ensure compatibility.
Consider the style and finish of the adapter. It should complement your new pendant light and match the decor of your room. Opt for a finish that harmonizes with other fixtures in your space for a cohesive look.
Think about the weight limit of the adapter. It’s crucial to choose one that can safely support your pendant light. Check the specifications and ensure it can handle the weight of your chosen fixture.
Securing The Adapter
Once you’ve chosen your adapter, securing it is the next step. Begin by turning off the power to the recessed light from your breaker panel to ensure safety. Then, remove the trim and bulb from the existing recessed can.
Follow the manufacturer’s instructions to attach the adapter. Typically, this involves inserting the adapter into the recessed light housing and tightening the screws or clips to hold it in place securely.
After securing the adapter, connect the wiring. Ensure the wires are firmly connected using wire nuts, and tuck them neatly into the housing. This step is crucial for safety and performance.
Have you ever transformed your lighting setup? What challenges did you face, and how did you overcome them? Share your thoughts and experiences in the comments below!

Credit: www.thestonybrookhouse.com
Wiring The Pendant Light
Wiring the pendant light is a crucial step in replacing recessed lighting. This process involves connecting the electrical wires securely. It ensures the pendant light functions safely and efficiently. Proper wiring is essential for both functionality and safety.
Connecting The Wires
First, turn off the power at the circuit breaker. Safety is the top priority. Remove the recessed light fixture. This exposes the electrical box and wires. Identify the wires: black, white, and ground. The black wire is live. The white wire is neutral. The bare or green wire is the ground. Strip about half an inch of insulation from the pendant light wires. Use wire connectors to join the wires. Connect black to black, white to white, and ground to ground. Ensure each connection is tight and secure.
Ensuring Proper Insulation
Proper insulation prevents electrical hazards. Use electrical tape to cover all wire connections. This provides an extra layer of safety. Double-check each connection for any exposed wires. They must be completely insulated. Position the wires inside the electrical box neatly. Ensure they do not touch any metal parts. This minimizes the risk of a short circuit. The insulation ensures the pendant light operates safely.
Attaching The Pendant Fixture
Switching recessed lighting to a pendant involves attaching the pendant fixture. Begin by removing the existing trim and housing. Secure the pendant bracket, ensuring it is firm, and then connect wires according to instructions.
Attaching the pendant fixture to replace your recessed lighting can transform the ambiance of a room. This task, while seemingly daunting, can be straightforward with some guidance. Picture the satisfaction of seeing your new pendant light hanging perfectly, casting a warm glow and accentuating your space. It’s not just about aesthetics; it’s also about adding your personal touch to your home. Let’s dive into the steps that will help you achieve that perfect look.Adjusting The Pendant Height
When you first unbox your pendant light, you might wonder how high or low it should hang. The height of your pendant light can dramatically affect the room’s look and feel. Generally, pendant lights above a kitchen island should hang about 30 to 36 inches above the countertop. Consider the room’s function. In dining areas, you might prefer the light a bit lower for a cozier feel. Test different heights by holding the fixture at various levels. This way, you can visually assess the best fit for your space before committing.Securing The Fixture
Securing your pendant fixture is crucial for safety and aesthetics. Once you’ve adjusted the height, it’s time to attach the fixture to the ceiling. Begin by ensuring that the power is off to avoid any electrical hazards. Use a mounting bracket, which typically comes with your pendant light kit, to secure the fixture to the existing electrical box. Tighten the screws carefully, ensuring the fixture is stable and aligned. This step is essential to prevent any wobbling or misalignment that could detract from the room’s look. Once secure, double-check all connections. Tug slightly on the fixture to ensure it’s firmly attached. This reassurance will give you peace of mind knowing your new pendant light is safe and secure. As you step back to admire your handiwork, consider how this simple change can refresh your home’s look.Testing The New Light
After installing your pendant light, testing is crucial. This ensures everything functions properly. It’s more than flipping a switch. It’s about verifying connections and brightness.
Proper testing avoids future issues. It confirms your installation was successful. Let’s explore some steps for testing your new pendant light.
Check The Connections
Ensure all wires are secure. Loose connections can cause flickering. Double-check the wire nuts. They should be tightly twisted.
Examine The Fixture
Inspect the fixture for damage. Look for cracks or bends. A damaged fixture can affect lighting quality.
Verify Bulb Compatibility
Use the correct bulb type. Different fixtures require specific bulbs. Check the manufacturer’s instructions. Incorrect bulbs can lead to poor lighting or damage.
Assess Light Output
Turn on the light and observe. Is it bright enough? Dim lighting may require a bulb change. Ensure the light covers the desired area.
Evaluate Dimmer Functionality
If you installed a dimmer, test its range. Ensure it smoothly transitions between brightness levels. A faulty dimmer can limit lighting options.
Once these steps are complete, your pendant light should work perfectly. Enjoy your newly enhanced space!
Troubleshooting Common Issues
Switching from recessed lighting to pendant fixtures can elevate any room’s look. Yet, some common issues might arise during the process. Understanding these issues ensures a smooth transition. Addressing them early can save time and reduce frustration.
Addressing Flickering Lights
Flickering lights can irritate and distract. Begin by checking the bulb. Ensure it’s seated properly in the socket. A loose bulb can often cause flickering. Also, examine the bulb type. LED bulbs sometimes flicker due to incompatible dimmers. Consider switching to compatible ones if needed. Inspect the wiring connections. Loose wires can disrupt the current flow. Tighten any loose connections with care.
Fixing Loose Connections
Loose connections can cause lights not to work. Start by turning off the power. Use a voltage tester to ensure safety. Next, remove the fixture’s canopy. Check the wire nuts connecting the wires. They should be snug and secure. If they aren’t, tighten them gently. Look for frayed or damaged wires. Replace them to ensure a reliable connection. Ensure the pendant is securely mounted. A steady fixture ensures long-term stability.
Maintenance Tips
Transform your space by swapping recessed lighting for stylish pendants. Begin by turning off the power. Remove the existing fixture. Install the pendant light kit by following the instructions. Ensure secure connections for safety. Enjoy the new look with enhanced lighting.
Changing recessed lighting to pendant lights can transform the ambiance of your space, bringing a touch of elegance and style. Once you’ve made the switch, maintaining your new pendant lights is crucial to ensure they continue to shine brightly and complement your room’s design. Let’s dive into some essential maintenance tips that will keep your pendant lights looking their best.Cleaning The Pendant Light
Cleaning your pendant lights doesn’t have to be a daunting task. Dust and grime can accumulate over time, dulling their shine. Use a soft cloth or a feather duster to gently wipe the surface of the pendant. For stubborn spots, a mild soap solution can work wonders. Remember to turn off the light and allow it to cool before cleaning. A clean pendant light not only improves the light quality but also enhances the overall look of your room. How often do you pay attention to the dust on your lights? Perhaps it’s time to add this task to your regular cleaning schedule.Replacing Bulbs
Bulbs have a limited lifespan, and replacing them promptly ensures your pendant light stays bright and functional. Before starting, ensure the power is turned off to avoid any accidents. Choose the right bulb for your pendant light. LED bulbs are a great choice—they last longer and save energy. Are you using energy-efficient bulbs in your home? Consider keeping spare bulbs handy, so you’re always prepared for a quick change. When was the last time you checked the wattage and type of bulb in your pendant? It might be time to upgrade to something more efficient. Maintaining your pendant lights can be straightforward with these simple steps. A clean light and a fresh bulb can make all the difference in your room’s atmosphere. So, why not take a few minutes today to give your pendant lights some much-needed attention? Your space—and your mood—will thank you!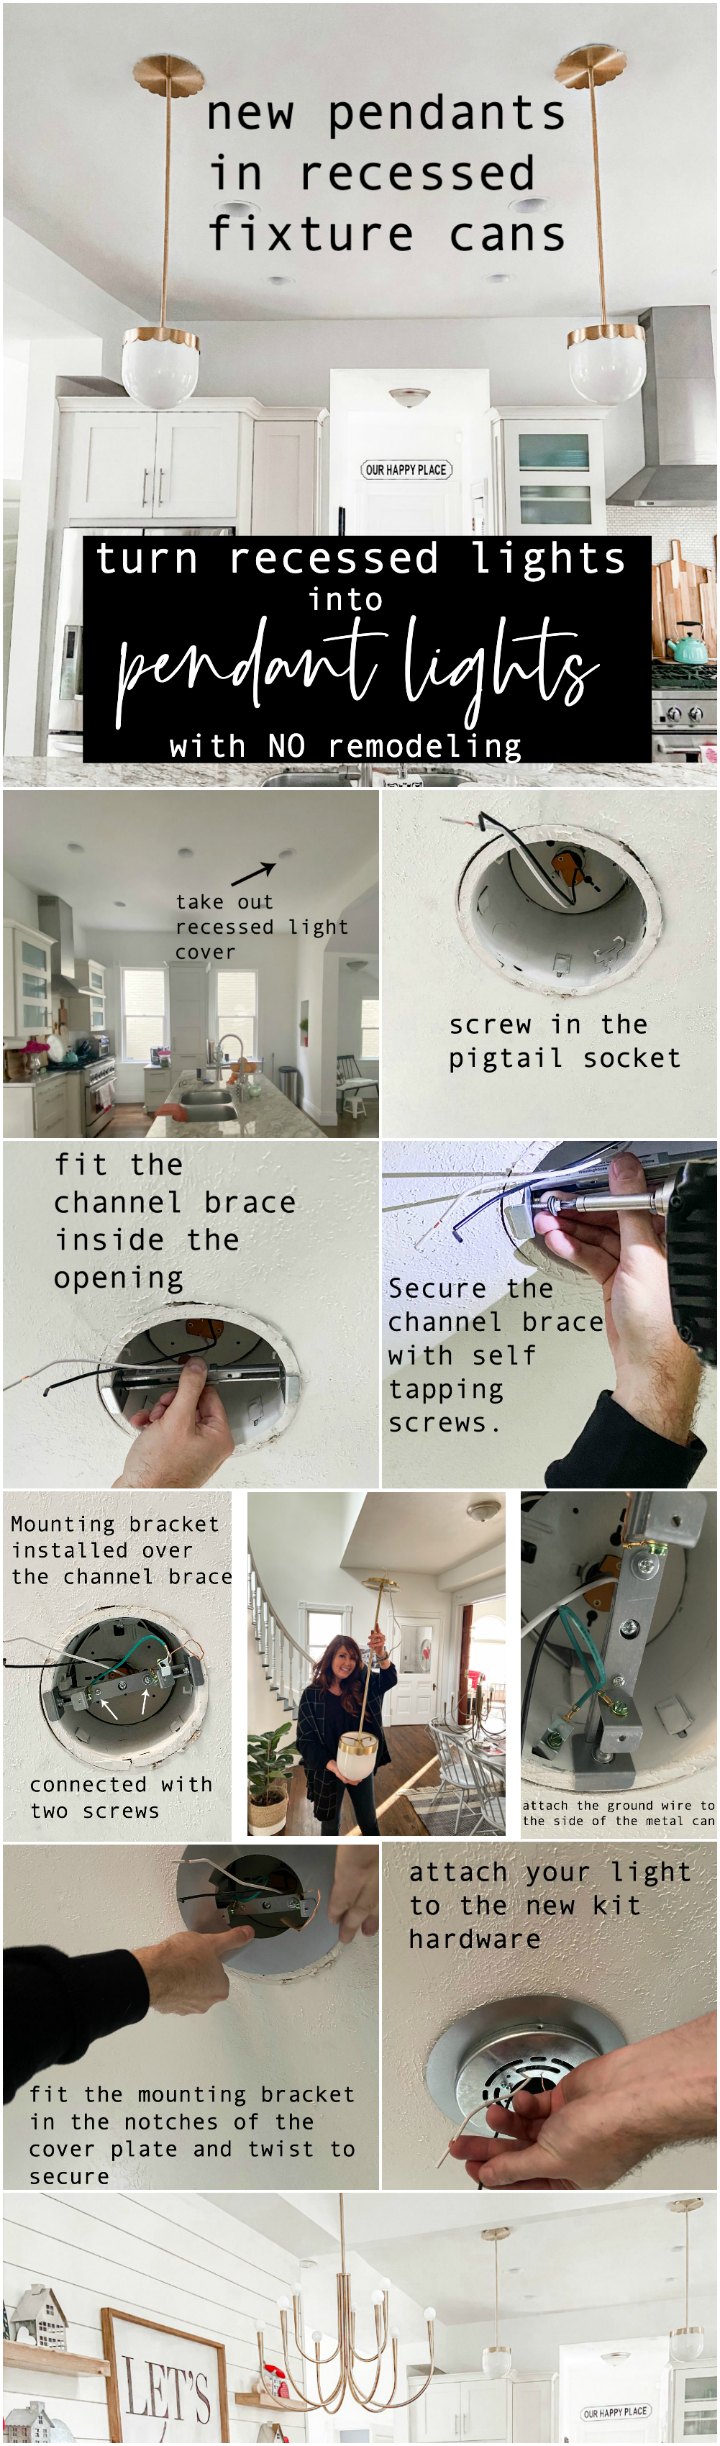
Credit: tatertotsandjello.com
Frequently Asked Questions
What Tools Are Needed To Change Recessed Lighting?
To change recessed lighting to pendant, you’ll need a screwdriver, wire cutters, and a voltage tester. Additionally, a pendant light conversion kit is essential. Make sure to have safety goggles and a ladder for easy access. These tools ensure a smooth and safe transition.
Can I Convert Recessed Lighting Myself?
Yes, you can convert recessed lighting to pendant by yourself. Ensure you have the right tools and follow safety precautions. A conversion kit simplifies the process. However, if unsure, consult a professional electrician to avoid mistakes and ensure safety.
How Long Does The Conversion Process Take?
The conversion process generally takes about one to two hours. This time frame includes removing the recessed fixture and installing the pendant light. However, it may vary based on your experience and tools. Proper preparation can make the process smoother and faster.
Is It Safe To Change Recessed Lighting?
Changing recessed lighting to pendant is safe if you follow safety guidelines. Ensure the power is off before starting. Use a voltage tester to double-check. If you’re unsure, consulting a professional can ensure safety. Proper handling of electrical components is crucial.
Conclusion
Updating your lighting can transform your room’s ambiance. Switching recessed lights to pendant lights is simple. Follow the steps, and your space will shine with new charm. Remember, safety is key. Turn off power before starting. Use quality tools for best results.
Pendant lights offer style and functionality. They create a focal point in any room. Choose designs that match your decor. Enjoy the cozy atmosphere they bring. Lighting change can refresh your home. It’s worth the effort and time. Get creative with your lighting choices.
Illuminate your space beautifully. Happy decorating!

Home Improvement Specialist & Writer at HomeFixio
Caden Rutherford is a seasoned home improvement specialist with extensive hands-on experience in residential construction, renovations, and design. With a keen eye for detail and a passion for transforming spaces, Caden shares practical advice and expert solutions to enhance the functionality and beauty of homes. As a writer for HomeFixio, Caden combines technical knowledge with creative flair, providing readers with informative guides on everything from structural improvements to aesthetic upgrades, empowering homeowners to achieve their ideal living spaces.