Do It Yourself Console Table: Transform Your Space Easily
Imagine the satisfaction of proudly displaying a piece of furniture in your home that you crafted with your own hands. A console table can be the perfect addition to your living space, offering both style and functionality.
Whether you’re looking to fill an empty hallway, enhance your entryway, or provide a charming backdrop for your decorative pieces, a DIY console table can achieve all this and more. You’re about to discover how you can create a stunning console table without breaking the bank or needing expert carpentry skills.
With the right guidance, you can transform basic materials into a masterpiece that reflects your personal taste. Get ready to unleash your creativity and see just how rewarding a DIY project can be. Keep reading, and you’ll find step-by-step instructions, tips, and inspiration to make your console table dreams a reality.
Benefits Of A Diy Console Table
Crafting your own console table lets you personalize design and size to suit your space. Save money by choosing affordable materials, and enjoy the satisfaction of building something unique.
Creating your own console table can be a rewarding experience, providing you with a unique piece of furniture tailored to your style and needs. Beyond the satisfaction of crafting something with your hands, a DIY console table offers several benefits. It’s not just about saving money—it’s about personalizing your space and honing your skills.Cost-effective Solution
Building a console table yourself can significantly reduce costs. Purchasing a ready-made table from a store often comes with a hefty price tag. When you make it yourself, you can choose materials that fit your budget without compromising on style.Customization To Fit Your Space
A DIY console table allows you to tailor the dimensions to fit perfectly in your home. You have the freedom to choose the height, width, and depth that suits your needs. This flexibility ensures that the table complements your space seamlessly.Creative Expression
Crafting your own console table is an opportunity to express your creativity. You can experiment with different designs, finishes, and materials. Whether you prefer rustic wood or sleek metal, the choice is yours to match your taste.Skill Development
Building a console table can be a great way to develop new skills. You learn about carpentry, painting, and design, which can be useful for future projects. Each step of the process—from planning to execution—builds your confidence.Environmental Benefits
By creating your own table, you have control over the materials you use. You can opt for sustainable and eco-friendly materials, reducing your environmental impact. This conscious choice contributes to a greener planet.Sense Of Accomplishment
There’s a distinct joy in completing a project with your own hands. When you see the finished table in your living room, you’ll feel a sense of pride and achievement. It’s a personal victory that reminds you of your capabilities. Have you ever considered how making your own furniture could transform your living space and your skills? With a DIY console table, you not only fill a functional need but also add a story to your home.Choosing The Right Materials
Choosing the right materials for your DIY console table can transform your space from ordinary to extraordinary. The materials you select will define the table’s durability, style, and overall aesthetic. Whether you’re drawn to the rustic charm of wood, the sleekness of metal, or the eco-friendly appeal of recycled materials, each option offers unique benefits. Let’s delve into these choices to help you craft a console table that reflects your personality and suits your home.
Wood Options
Wood is a timeless choice that offers warmth and versatility. Consider using oak for its durability or pine for a more cost-effective option. If you prefer something unique, explore reclaimed wood with its rich history and character. Picture the satisfaction of running your hand over a surface that once had a life as a barn door or an old ship plank. Each piece of wood tells a story and adds a unique touch to your home.
Metal Accents
Adding metal accents can lend a modern, industrial edge to your console table. Think about using steel legs for strength and stability. Brass or copper finishes can offer a touch of elegance and sophistication. Imagine the contrast of a sleek metal frame against a rustic wooden top—it’s a perfect blend of old and new. Ask yourself, what vibe do you want your table to convey?
Recycled Materials
Embracing recycled materials is a sustainable choice that also adds character to your piece. Consider using old doors or salvaged wood panels for a tabletop. Incorporate leftover metal pieces for accents or legs. Not only does this approach reduce waste, but it also gives your table a story and a unique aesthetic. Imagine the pride you’ll feel knowing your creation is not only beautiful but also eco-friendly.
Choosing the right materials is more than just picking what’s on trend. It’s about creating a piece that’s truly yours. What story do you want your console table to tell?
Tools Needed For Construction
Building a DIY console table requires basic tools like a tape measure, saw, drill, and screwdriver. Sandpaper smooths edges, while a level ensures balance. A paintbrush adds a personal touch with your chosen finish.
Creating your own console table can be a rewarding and fulfilling project. But before you roll up your sleeves, it’s crucial to gather the right tools for the job. Having the appropriate tools not only makes the process smoother but also ensures that your finished piece is sturdy and professional-looking. Let’s dive into the essentials you’ll need for building a DIY console table.Essential Hand Tools
Start with a measuring tape to ensure your cuts and placements are precise. A good hammer is vital for assembling pieces and securing nails. Don’t forget a screwdriver set for tightening screws and making adjustments. A hand saw might also come in handy for smaller cuts or if you prefer a more traditional approach. When I built my first console table, I underestimated the importance of a quality square. It helped me keep my angles accurate, preventing a wobbly table. Ever tried to balance a coffee cup on a tilted surface? Not ideal!Power Tools
Power tools can significantly speed up your project. A power drill is indispensable for creating holes and driving screws quickly. If you’re working with larger pieces of wood, a circular saw can make cutting a breeze. Consider using a sander to smooth out surfaces and edges, giving your table a polished finish. I remember the time I attempted to sand my table manually. Hours later, with sore arms and a mediocre result, I realized a power sander would have been a game-changer.Safety Equipment
Safety should be your top priority. Safety goggles protect your eyes from debris and dust. A pair of work gloves can shield your hands from splinters and sharp edges. Don’t skip on a dust mask, especially when sanding, to protect your lungs from inhaling fine particles. Have you ever thought about how a small oversight in safety can lead to big regrets? It’s a lesson I learned the hard way when a stray wood chip flew towards my face. — Equipped with these tools, you’re ready to tackle your console table project with confidence. What tools have you found indispensable in your DIY projects? Sharing your experiences can help others avoid common pitfalls and make better choices. Let’s create something amazing together!
Credit: saffronavenue.com
Design Ideas And Styles
Create your own console table to add charm to any room. Choose rustic wood or sleek metal for style. Personalize with paint or stain for a unique touch.
Creating your own console table offers a fantastic opportunity to showcase your personal style and creativity. Whether you’re a seasoned DIY enthusiast or just starting out, the design possibilities are endless. The right console table can transform your space, offering both functionality and aesthetic appeal. Let’s dive into some inspiring design ideas and styles that you can consider for your DIY console table project.Modern Minimalist
If you love clean lines and simplicity, a modern minimalist console table might be your perfect choice. Think smooth surfaces and neutral colors like white, black, or gray. You can use materials like glass, metal, or sleek wood. Imagine a slim table with a single shelf, where less is more, creating an uncluttered look. Adding a minimalist console table can open up your space, making it feel larger and more airy. Try incorporating elements such as a small vase or a single framed photo. The key is to keep it simple yet elegant. How can you make the most of minimalism in your home?Rustic Charm
For those who love a cozy, warm atmosphere, a rustic charm style might be your go-to. Picture a table made from reclaimed wood with visible grains and knots. A rustic console table can add character and a touch of nature to your home. You might use distressed finishes to enhance its authentic feel. Consider adding metal accents like iron or copper to complement the wood. Perhaps you have an old wooden door or pallet waiting to be transformed into a unique piece. What items can you repurpose to bring rustic charm into your living space?Industrial Vibes
Industrial style is all about mixing raw materials with utilitarian design. Imagine a console table constructed from metal pipes and wood. This style embraces rugged textures and bold designs. It’s perfect for creating a statement piece that draws the eye. You can experiment with colors like charcoal, gray, or even rusty hues. Industrial vibes can be enhanced with exposed screws and bolts. Think about how you can incorporate these elements to craft a functional yet stylish console table. Could your space benefit from a touch of industrial edge?Mid-century Touch
Mid-century design is known for its timeless appeal and elegant simplicity. A mid-century touch can be achieved with tapered legs and smooth surfaces. Use warm wood tones like walnut or teak to bring warmth and sophistication into your room. Consider incorporating retro elements like geometric patterns or brass hardware. A mid-century console table can serve as a focal point in any room, adding a touch of vintage charm. Do you have a fondness for retro aesthetics that could enhance your living space? Each style offers its unique flair and can transform your console table into a piece that truly reflects your personality. Which design idea resonates with you the most?Step-by-step Construction Guide
Creating a DIY console table can transform your living space with a touch of personal craftsmanship. This step-by-step guide will walk you through the process, making sure you have everything you need to build a stylish and functional piece of furniture. Whether you’re a seasoned DIY enthusiast or a beginner, this guide will help you create a console table that reflects your unique taste and style.
Preparing The Workspace
Start by clearing a space where you can work comfortably. Ensure you have enough room for your materials and tools. A garage or a spacious room works best.
Lay down a tarp or protective sheet to keep your floor clean and scratch-free. Gather your tools, such as a saw, drill, and measuring tape, and keep them within easy reach.
Have you organized your materials? Having wood, screws, and sandpaper ready will streamline your process and keep you focused.
Cutting And Assembling
Measure the wood according to your desired table dimensions. Double-check your measurements to avoid any mishaps later.
Use a saw to cut the wood pieces. If you’re new to using a saw, practice on scrap wood first to gain confidence. Safety goggles are a must!
Once cut, begin assembling the table. Align the pieces and secure them with screws. A drill makes this task quicker and ensures a firm hold.
Finishing Touches
Smooth out any rough edges with sandpaper. This step is crucial for a polished look and safe use.
Consider staining or painting your table to match your room’s decor. A coat of varnish will protect the wood and enhance its natural beauty.
Why not add a personal touch? Custom drawer knobs or a unique stencil design can give your table a distinctive flair.
Building a console table yourself not only saves money but also gives you a sense of accomplishment. What unique elements will you add to your design?
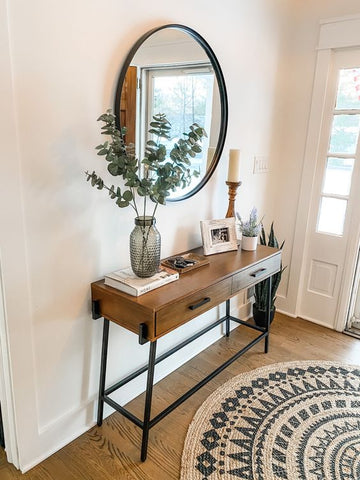
Decorating Your Console Table
Decorating your console table adds style to your space. It offers an opportunity to showcase your creativity. A well-decorated console table can transform your room. It provides a focal point and enhances the overall decor. Explore different styles and themes that suit your taste. Use a mix of objects and textures for a balanced look. Discover how to create artistic arrangements, functional displays, and seasonal decor.
Artistic Arrangements
Artistic arrangements bring a touch of elegance. Use art pieces, vases, or sculptures. Place them at varying heights for depth. Consider using a large mirror as a backdrop. It reflects light and adds dimension. Group items in odd numbers for a natural look. Play with colors and patterns to match your room’s theme.
Functional Displays
A console table can be both beautiful and useful. Add baskets or trays for organization. Store keys, mail, or small essentials. Use books as decorative elements. Stack them horizontally for interest. Incorporate a lamp for soft lighting. It can make your table a practical piece in your home.
Seasonal Decor
Change your console table decor with the seasons. For spring, use fresh flowers and pastel colors. In summer, consider using shells or beach-themed items. Fall decor can include pumpkins and warm tones. Winter might feature pinecones and candles. Seasonal items keep your space feeling fresh and inviting.
Maintenance And Care Tips
Maintaining your DIY console table ensures its longevity and beauty. Proper care keeps the table looking fresh. Regular cleaning and occasional repairs help preserve its charm. Simple techniques can make a big difference. Let’s explore some essential maintenance tips.
Cleaning Techniques
Dust the table weekly with a soft cloth. This prevents build-up and scratches. For deeper cleaning, use a mild soap solution. Avoid harsh chemicals that can damage the finish. Wipe spills immediately to prevent stains. Keep the surface dry to avoid water marks.
Repair And Refinishing
Inspect the table for loose joints regularly. Tighten screws and bolts as needed. For small scratches, use a wood repair pen. It blends well with the original finish. Sand and refinish larger damaged areas. Use a matching stain for a consistent look. Refinish every couple of years for lasting appeal.

Credit: www.youtube.com
Inspiring Success Stories
Creating your own console table can be a fulfilling experience. Many have shared their success stories, inspiring others to start their own projects. These stories showcase creativity and the joy of crafting something unique.
Diy Enthusiasts Turn Ideas Into Reality
Sarah, a DIY enthusiast, crafted her own console table from reclaimed wood. She found the materials at a local salvage yard. Her table became the centerpiece of her living room. Friends often compliment her work, asking how she achieved such elegance.
Transforming Spaces With Personal Touch
David wanted a console table that matched his home decor. Unable to find the perfect piece, he decided to build one himself. Using tutorials, he constructed a table that fit seamlessly with his style. His family admired the table’s bespoke charm.
Overcoming Challenges With Creativity
Emily faced challenges while building her console table. The wood she chose was difficult to work with. Determined, she adapted her design, adding a unique twist. Her persistence paid off, resulting in a table that is both functional and beautiful.
Sharing Success To Inspire Others
Many DIY creators share their stories online. Their experiences motivate others to try their hand at crafting. Each success story provides inspiration and practical tips for new projects. They foster a community of creativity and support.

Credit: farmhouseishblog.com
Frequently Asked Questions
How Do You Build A Console Table Yourself?
Building a console table yourself is simple and rewarding. Start with a design plan and gather necessary materials. Cut wood pieces to size, assemble using screws or nails, and sand for a smooth finish. Finally, apply your preferred paint or stain for the desired look.
What Materials Are Needed For A Diy Console Table?
For a DIY console table, you’ll need wood, screws or nails, sandpaper, and paint or stain. Choose quality wood like pine, oak, or walnut for durability. Tools such as a saw, drill, and measuring tape are essential for precise assembly and finishing touches.
How Long Does It Take To Make A Console Table?
Building a console table typically takes around 4 to 6 hours. This includes designing, cutting, assembling, and finishing. Time may vary based on complexity and personal skill level. Allocate additional time for paint or stain to dry completely before using your new table.
Can Beginners Make A Console Table Easily?
Yes, beginners can make a console table easily with basic woodworking skills. Simple designs are ideal for novices. Follow step-by-step guides and take safety precautions. Practice measuring and cutting before starting. Online tutorials and DIY communities can offer additional support and guidance.
Conclusion
Creating your own console table is rewarding and fun. You gain a unique piece that reflects your style. Plus, it saves money. The process teaches useful skills, too. Each step brings satisfaction and pride. Your home gets a new, personal touch.
Friends and family will admire your handiwork. DIY projects offer a break from routine. So, pick your tools and start today. Enjoy the journey and the result. Happy crafting!

Home Interior Design & Renovation Expert at HomeFixio
Sierra Wellington is a skilled home interior designer with extensive experience in plumbing, fittings, and home renovations. Having worked on numerous residential projects, Sierra specializes in creating functional and aesthetically pleasing spaces. With a keen eye for design and a deep understanding of the technical aspects of home improvement, he provides expert advice on everything from layout planning to fixture installations. As a writer for HomeFixio, Sierra shares his practical insights and creative solutions, helping homeowners elevate their spaces with precision and style.