How to Make a Wooden Spoon: A Step-by-Step Guide
Have you ever held a wooden spoon and admired its simplicity and charm? There’s something uniquely satisfying about using a tool crafted from nature itself.
Imagine the pride and joy of stirring your favorite dish with a spoon made by your own hands. Whether you’re a seasoned woodworker or a complete beginner, making a wooden spoon can be a rewarding experience. It’s an opportunity to slow down, connect with the material, and create something truly personal.
You might be surprised at how therapeutic and fulfilling this process can be. In this guide, we’ll walk you through each step, ensuring you not only craft a beautiful spoon but also enjoy every moment of creating it. So, are you ready to transform a simple block of wood into a masterpiece you’ll cherish for years? Let’s dive in!
Choosing The Right Wood
Choosing the right wood for your wooden spoon is crucial. The wood’s characteristics affect the spoon’s durability and appearance. Different woods offer unique benefits, making it essential to understand your options.
Types Of Wood
Maple is a popular choice for wooden spoons. It is durable and has a smooth surface. Cherry wood offers a rich color and smooth texture. It is slightly softer than maple. Walnut is darker and provides a unique grain pattern. It is strong and has a beautiful finish.
Selecting The Best Grain
The grain of the wood affects the spoon’s strength. Straight grain is ideal for a sturdy spoon. It is less likely to crack or warp. Curly grain adds visual interest but requires more skill to carve. Always inspect the grain carefully before choosing your wood. This ensures your spoon will last.
Gathering Necessary Tools
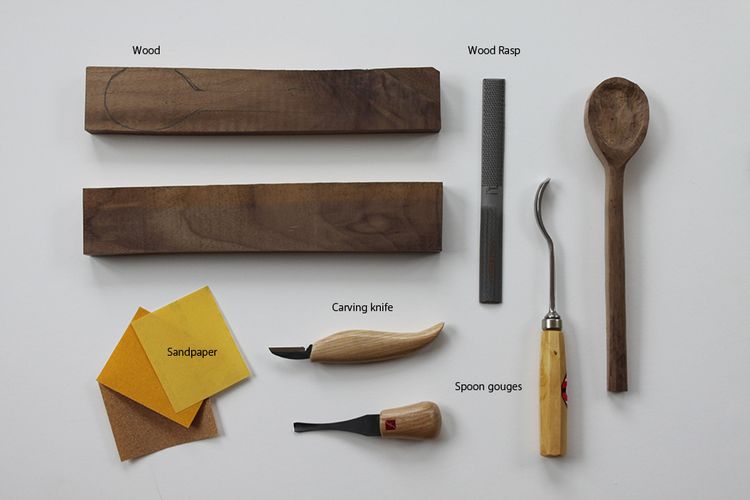
Gather essential tools like carving knives, sandpaper, and a mallet for crafting a wooden spoon. A sturdy workbench helps in precision and safety. Having the right equipment ensures smooth carving and finishing.
Creating your own wooden spoon is not only a satisfying project but also a useful skill. Whether you’re a beginner or a seasoned woodworker, gathering the right tools is crucial. Proper tools will ensure your crafting process is smooth and enjoyable. Let’s dive into what you’ll need to get started.
Basic Tools Needed
Starting with the basics, you’ll need a few essential tools to shape your spoon. A wooden blank is your starting point, often a block of wood like cherry or maple. A pencil helps outline your design. A handsaw is perfect for cutting the initial shape of the spoon. You’ll also need a gouge, a curved chisel, to carve out the bowl of your spoon. A carving knife will help refine the edges and give the spoon its final shape. Lastly, sandpaper smooths out any rough surfaces, making the spoon ready for use.
Advanced Tools For Precision
If you’re looking to achieve a more polished finish, consider adding a few advanced tools to your collection. A spokeshave is excellent for shaping the handle with precision. The drawknife is another tool that offers more control for refining your spoon’s shape. For those intricate details, a Dremel tool can be invaluable. It allows you to create fine carvings and detailed designs on your spoon.
If you’ve ever struggled with achieving a smooth finish, a microplane can make all the difference. It’s perfect for those final touches, ensuring your spoon is as smooth as silk. Have you ever wished for a tool that could do it all? While no single tool can replace the need for skill and practice, these advanced options can certainly enhance your craftsmanship. Remember, the right tools make all the difference in your woodworking journey. Whether you’re starting with the basics or stepping up your game with advanced tools, each choice brings you closer to creating a unique, handcrafted wooden spoon.
Preparing The Wood
Preparing the wood is an essential step in crafting a wooden spoon. Before you start carving, you need to ensure the wood is ready for shaping. This initial stage sets the foundation for your spoon’s design and functionality. It’s a bit like setting the stage for a play—without the right prep, the performance can’t shine. Let’s break down the preparation process.
Cutting The Wood Block
Start by choosing a suitable wood type. Hardwoods like cherry or maple are excellent choices as they are durable and easy to carve. Avoid softwoods as they tend to splinter easily.
Once you’ve selected your wood, cut it into a manageable block. Aim for a size that comfortably fits in your hand, typically around 2 inches thick. This size gives you enough material to work with without overwhelming you.
Consider the grain direction while cutting. Align the block so the grain runs lengthwise. This orientation will make carving smoother and enhance the spoon’s strength.
Smoothing The Surface
After cutting, the wood block might have rough edges or uneven surfaces. Use a rasp or coarse sandpaper to smooth these imperfections out. The goal is to create a uniform surface that’s easy to carve.
As you smooth the wood, pay attention to its texture. Run your fingers over the surface to feel for any rough patches. Think of this as a tactile experience, almost like reading Braille, ensuring every part is ready for your next move.
Don’t rush this step. A well-prepared surface makes the carving process more enjoyable and efficient. Have you ever skipped a step in a recipe and ended up with a flawed dish? The same principle applies here.
Once the surface is smooth, you’re ready to carve your spoon’s shape. Imagine the possibilities now that your wood is prepped and primed. What shape will your spoon take?
Preparing the wood is more than just a task—it’s an opportunity to connect with your craft and set the stage for creativity. So grab your wood block and get started. You’ll appreciate the care you took in these early steps once your spoon begins to take shape.
Credit: www.youtube.com
Designing Your Spoon
Creating a wooden spoon is a rewarding craft. The design stage is crucial. It sets the foundation for your spoon’s uniqueness. This involves sketching and understanding the spoon’s purpose. Each step is vital in ensuring your spoon is both functional and beautiful.
Sketching The Outline
Start by sketching a rough outline. Use a pencil and paper. Imagine the spoon’s shape. Do you want a wide or narrow bowl? Consider the handle length. A longer handle gives better grip. Sketch different shapes until satisfied. This sketch guides your carving process.
Determining The Spoon’s Function
Think about the spoon’s use. Will it stir soup or serve pasta? This affects its design. A soup spoon needs a deep bowl. Serving spoons can be broader. Consider the strength needed. A serving spoon should be sturdy. The spoon’s function dictates its final form.
Carving The Spoon
Carving a wooden spoon is a rewarding task. It transforms a simple piece of wood into a functional art piece. With patience and the right tools, anyone can carve a beautiful spoon. This section will guide you through the carving process. Let’s explore how to shape and refine your wooden spoon.
Initial Shaping
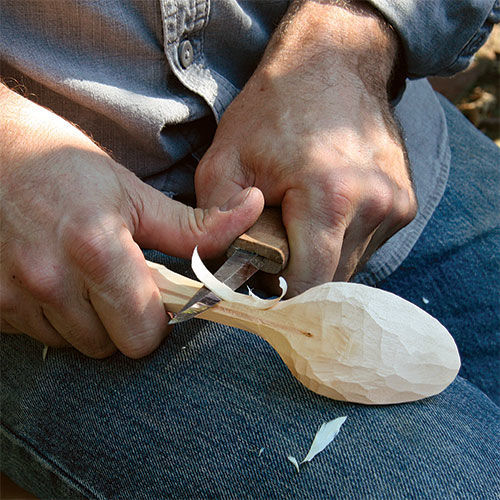
Start by selecting the right wood. Choose a wood that is soft and easy to carve. Draw the outline of the spoon on the wood. Use a pencil for clear visibility. Begin carving with a carving knife. Remove excess wood around the spoon’s outline. Focus on creating a rough spoon shape. Carve slowly to avoid mistakes.
Hold the knife with a firm grip. Carve along the grain of the wood. This helps in smooth carving. Ensure your movements are controlled and steady. Work on the bowl of the spoon first. Gradually shape the handle next. Check the shape frequently. Adjust as needed to achieve the desired form.
Refining The Details
Once the initial shape is complete, refine the details. Use finer tools for detailed carving. A gouge is useful for smoothing the spoon’s bowl. Focus on the edges and curves. Make sure they are smooth and even. Pay attention to the thickness. Ensure the spoon is functional and comfortable.
Sand the spoon with sandpaper. Start with coarse grit to remove rough spots. Progress to finer grit for a smooth finish. Sanding enhances the spoon’s appearance. It also ensures safety during use. Check the spoon for any imperfections. Make final adjustments with a carving knife.
Consider adding decorative carvings. Simple designs can enhance the spoon’s beauty. Use a chip carving knife for intricate patterns. Avoid over-carving, as it can weaken the spoon. Keep your designs simple and elegant.
Sanding And Finishing
Crafting a wooden spoon involves careful sanding to smooth edges and eliminate rough surfaces. Finishing adds protection and enhances the spoon’s natural beauty. Together, these steps ensure a durable and attractive kitchen utensil.
Creating a wooden spoon is a rewarding craft that combines creativity and skill. After carving the basic shape, sanding and finishing are crucial steps that bring your spoon to life. These steps not only enhance the spoon’s appearance but also ensure its durability and functionality in the kitchen.
Sanding Techniques
Sanding is where the magic happens. It transforms a roughly carved piece into a smooth, elegant tool. Start with coarse sandpaper, around 80-grit, to remove carving marks and even out the surface. Gradually move to finer grits like 120, 220, and finish with 400-grit for a silky smooth touch. Always sand with the grain to avoid scratches and achieve a polished look. Feeling the wood under your fingers is key. Let your hands guide you to spots that need more attention. Imagine how the spoon will feel when you use it.
Applying A Finish
Once sanding is complete, it’s time to apply a finish. This step not only enhances the wood’s natural beauty but also protects it from moisture and wear. Consider using food-safe finishes like mineral oil or beeswax. These are easy to apply and maintain, making them ideal for kitchenware. Apply a generous amount of your chosen finish with a clean cloth, allowing it to soak into the wood. Let it sit for a few minutes, then buff away the excess for a soft sheen. How does the spoon look and feel now? The finish should bring out the grain and add a subtle glow. This final step is what transforms your wooden spoon into a treasured kitchen companion.
Maintaining Your Wooden Spoon
Crafting a wooden spoon starts with selecting the right wood, ensuring it’s strong yet easy to carve. Regular sanding smooths edges, creating a comfortable grip. To maintain the spoon, apply food-safe oil for a lasting finish. Avoid soaking; rinse and dry promptly to preserve its natural beauty and durability.
Maintaining your wooden spoon is crucial to ensure it remains a staple in your kitchen for years to come. A well-cared-for spoon not only lasts longer but also enhances your cooking experience. You’ve taken the time to craft or choose a beautiful wooden spoon, now it’s time to give it the care it deserves.
Cleaning Tips
Cleaning your wooden spoon properly extends its life and keeps it safe for food use. Avoid soaking it in water, as wood absorbs moisture and can warp. Instead, wash it quickly with warm, soapy water, and dry it immediately with a towel. Every now and then, consider rubbing it with a mixture of lemon juice and baking soda. This not only cleans but also deodorizes your spoon. Remember, high heat is its enemy. So, keep it away from dishwashers and microwaves.
Repairing Scratches
Scratches are inevitable with regular use. But don’t worry, you can easily fix them at home. Gently sand the scratched area with fine-grit sandpaper. This smooths out the surface and removes any roughness. After sanding, apply a coat of mineral oil to restore its natural sheen. Let it soak overnight and wipe off excess oil in the morning. You’ll be surprised at how new and polished your spoon looks. Have you ever considered how a simple repair can make your spoon look brand new? It’s a small effort with a big payoff for your kitchen tools.
Credit: www.finewoodworking.com
Credit: www.instructables.com
Frequently Asked Questions
What Wood Is Best For A Wooden Spoon?
Hardwoods like maple, cherry, and walnut are ideal for wooden spoons. These woods are durable and food-safe. They have tight grains, which prevent splintering. Hardwoods also resist absorbing moisture, reducing the chance of bacteria buildup. Choose sustainably sourced wood for an eco-friendly option.
How Do I Carve A Wooden Spoon?
Start by sketching your spoon design on wood. Use a saw to cut the rough shape. Employ carving tools to refine the shape and details. Sand the spoon smoothly to remove any rough edges. Finish with food-safe oil to protect the wood and enhance its appearance.
What Tools Are Needed To Make A Wooden Spoon?
You’ll need a saw, carving knife, and sandpaper for basic spoon making. Additional tools like gouges and rasps can refine details. A workbench or clamp helps secure the wood. Safety gear, such as goggles and gloves, is essential for protection during the carving process.
How Do I Finish A Wooden Spoon?
Apply food-safe oil like mineral oil or beeswax to the spoon. This protects the wood and enhances its grain. Let the oil soak in for several hours, then wipe off excess. Regular reapplication helps maintain the spoon’s condition and prolongs its lifespan.
Conclusion
Creating a wooden spoon is a rewarding experience. You start with a simple piece of wood. Then carve, shape, and sand it. Each step brings your spoon to life. This craft teaches patience and skill. It connects you to nature and tradition.
The end result? A useful kitchen tool made by your own hands. Enjoy the process and the satisfaction it brings. Share your handmade spoon with others. Inspire them to try this fulfilling hobby. Remember, crafting is more about the journey than the destination.
Embrace the imperfections. They make your spoon unique and special.

Home Improvement Expert & Senior Writer at HomeFixio
Eliot Granger is a seasoned home improvement expert with years of experience transforming living spaces. Specializing in everything from kitchen renovations to bathroom upgrades, Eliot shares his knowledge through practical, insightful articles. His passion for creating functional, beautiful homes drives him to offer expert tips and solutions for every corner of your house. As a trusted writer for HomeFixio, Eliot is dedicated to helping homeowners make informed decisions and achieve precision in their projects.


