How to Dismantle Recliner Chair: Easy Step-by-Step Guide
Are you staring at that bulky recliner chair in your living room, wondering how to take it apart without calling in professional help? Dismantling a recliner chair might seem daunting at first, but with the right guidance, you can do it yourself quickly and efficiently.
Imagine the satisfaction of mastering this task and the extra space you’ll gain once it’s done. This guide is crafted specifically for you, focusing on simple steps that will make the process easy and stress-free. Whether you’re preparing for a move, making room for new furniture, or just curious about the inner workings of your chair, this article will provide you with all the insights you need.
Dive in and discover how straightforward it can be to dismantle your recliner with confidence and ease.
Tools And Materials Needed
To dismantle a recliner chair, you need some basic tools. A screwdriveris essential. It helps to remove screws. A wrenchis also useful. It loosens bolts easily. Having a hammercan help with stuck parts. A pair of pliersmay be needed too. It grips tight surfaces. You might also need a rubber mallet. It helps in gentle tapping. A soft clothis good for cleaning parts. Gather these tools before starting. They make the task easier and faster. Be sure to work in a well-lit area. This helps you see all parts clearly. Always keep safety in mind while working.

Credit: www.wikihow.com
Preparing The Workspace
Move all furniture away. Make sure the floor is clean. Safety is very important. You need room to move around. Keep the space tidy. This helps prevent accidents. Tools should be easy to reach. Keep kids and pets away. Focus on the task without distractions.
Gather tools like screwdrivers and wrenches. Find a soft cloth to protect surfaces. Keep a plastic bag for screws. Use gloves to protect hands. Instructions are helpful. Lay out all items. Check nothing is missing. Organize tools neatly. Plan your steps carefully.
Removing The Cushions
Seat cushions are usually attached with Velcro or zippers. Find the attaching points. Gently pull the cushion away. Undo any zippers if needed. Don’t use force. Check for hidden ties or clips. Inspect each cushion closely. Keep the cushions aside safely.
Back cushions might be hooked or clipped. Locate these hooks or clips. Carefully unhook the cushions. Look for zippers on the back. Unzip if there are any. Ensure you don’t rip the fabric. Place the cushions in a safe spot. Store them away from dust.
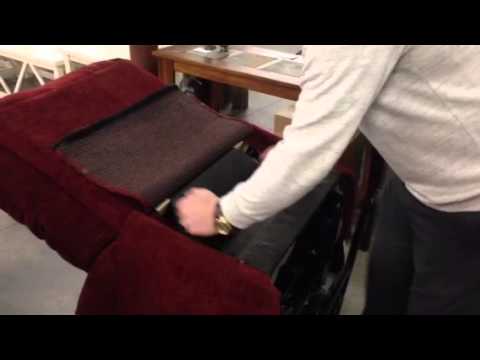
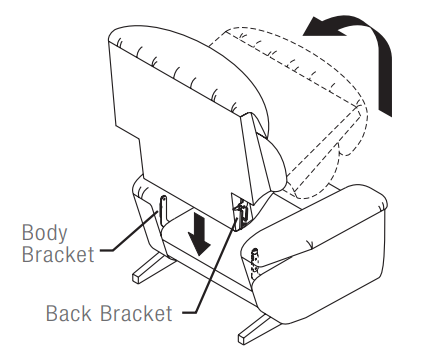
Disassembling The Backrest
Find the release mechanismon the backrest. Usually, it is a latch or lever. Check near the bottom or sides of the backrest. This part helps in unlockingthe backrest from the main frame. It is important to locate it first.
After finding the release mechanism, you can start detaching. Pull or lift the latch carefully. The backrest should come loosefrom the frame. Ensure you do not use excessive force. Gently slide or lift the backrest off the chair. Keep the backrest aside safely. Now, you can focus on other parts of the chair.
Taking Apart The Footrest
First, find the footrest hinge. It connects the footrest to the chair. Look near the bottom of the seat. Most hinges are metal. Some may have a cover. The cover could be fabric or plastic. Remove the cover if needed. Use your hands or a small tool. Make sure you can see the hinge clearly.
Next, unscrew the footrest. Use a screwdriver. Find the screws on the hinge. There may be two or more. Turn each screw left to loosen. Take your time. Keep the screws in a safe place. The footrest will come off once screws are loose. Pull gently to remove it.
Disassembling The Frame
First, find the screws on the armrest base. Use a screwdriver to loosenthem. Keep all screws in a safe place. Carefully pull the armrest away from the frame. Check for any hidden clips. If there are any, gently remove them. Watch your fingers while doing this. Armrests can be heavy.
Look under the recliner for bolts. These bolts hold the base together. Use a wrench to unscrewthem. Be gentle to avoid damage. Once loose, lift each base piece. Keep parts in order for easy reassembly. Ask for help if pieces are too heavy. Always work in a clear space.
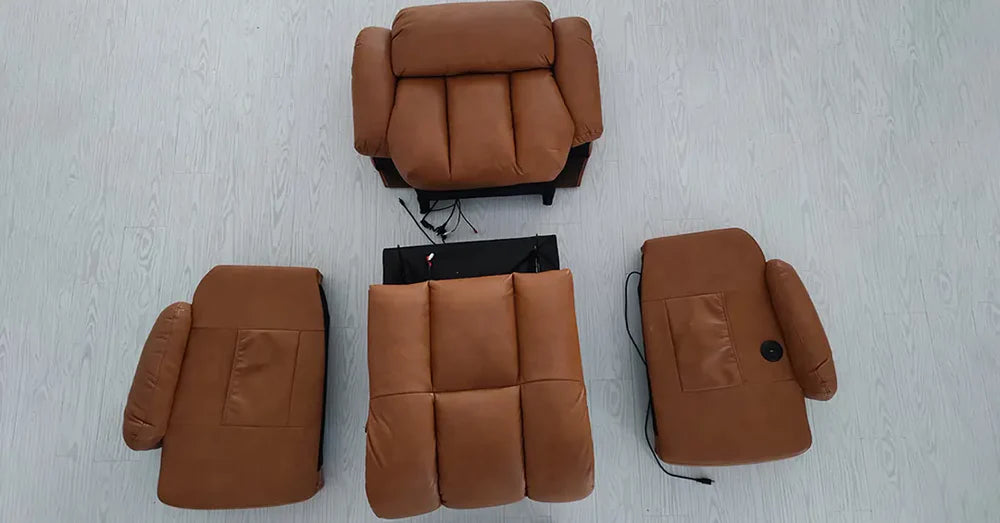
Organizing And Storing Parts
Use small bags for screws, nuts, and bolts. Label each bag clearly. This helps you remember where each part belongs. Use tape or sticky notes for labeling. You can also use a marker on the bags. Keeping parts together avoids losing them. It makes reassembly easier.
Place large parts in a safe corner. Lay cushions flat to prevent them from bending. Use old blankets to cover parts. This keeps them clean and dust-free. Avoid stacking heavy parts on top. It can damage them. Secure parts to prevent them from falling. Ensure they are not in the way. This avoids trips or accidents.
Credit: www.stylemeetscomfort.ca
Troubleshooting Common Issues
Sometimes screws or bolts get stuck. Use a screwdriver to loosen them. Apply penetrating oil if needed. Let the oil sit for a while. Wiggle the screwdriver gently. Don’t rush or force it. Patience helps in this task. Rust might be the problem. Clean it with a wire brush. Check the screw heads for damage. Replace them if needed. Safety is important. Wear gloves to protect your hands. Organize screws in a safe place.
Recliner mechanisms may wear out. Inspect them for damage. Look for loose parts or broken springs. Lubricate moving parts with oil. This can help reduce friction. Test the recliner motion. Does it move smoothly? Replace worn springs or parts. Consult a manual for specific instructions. Remember to be careful. Reassemble everything correctly. Check for missing screws or bolts. Safety is important. Always double-check your work.
Credit: www.youtube.com
Frequently Asked Questions
How Do I Start Dismantling A Recliner Chair?
Begin by removing the cushions and any detachable parts. This provides easier access to the frame and mechanisms. Use the appropriate tools, like screwdrivers and wrenches, to safely disassemble the chair. Always refer to the manufacturer’s instructions, as they can offer specific guidance.
What Tools Are Needed For Dismantling?
Essential tools include screwdrivers, wrenches, and pliers. These will help you remove screws, bolts, and pins. A flashlight can be useful for identifying hidden components. Ensure you have a clean, organized workspace to avoid losing small parts.
Can All Recliner Chairs Be Dismantled?
Most recliner chairs can be dismantled, but it’s important to check the manufacturer’s guidelines. Some models have unique mechanisms or parts that require special tools or care. Always ensure you’re familiar with the specific recliner model before starting the disassembly process.
Why Should I Dismantle My Recliner Chair?
Dismantling a recliner chair can be necessary for repairs, moving, or recycling. Taking it apart makes transportation easier and prevents damage. It also helps in identifying worn-out parts that need replacement, ensuring your chair remains comfortable and functional.
Conclusion
Taking apart a recliner chair is not hard. Follow simple steps. Use the right tools. Be careful with screws and bolts. Label parts for easy reassembly. Store small pieces safely. Work in a clean space. Remember to consult the chair’s manual if needed.
Practice patience and focus. Enjoy the process of learning something new. Soon, you’ll dismantle chairs with confidence. Share your tips with friends. Encourage others to try. With these guidelines, anyone can do it. Happy dismantling!

Home Interior Design & Renovation Expert at HomeFixio
Sierra Wellington is a skilled home interior designer with extensive experience in plumbing, fittings, and home renovations. Having worked on numerous residential projects, Sierra specializes in creating functional and aesthetically pleasing spaces. With a keen eye for design and a deep understanding of the technical aspects of home improvement, he provides expert advice on everything from layout planning to fixture installations. As a writer for HomeFixio, Sierra shares his practical insights and creative solutions, helping homeowners elevate their spaces with precision and style.