How Do You Remove Toilet Paper Holder With Hidden Screws: Easy Steps
Ever faced the frustration of a wobbly toilet paper holder with no visible screws? You might wonder how to remove it without causing damage.
This seemingly simple task can become a head-scratcher when hidden screws are involved. You’re not alone—many homeowners encounter this issue. The good news? Removing a toilet paper holder with hidden screws is easier than it seems, and you can do it with just a little guidance.
Imagine the satisfaction of successfully tackling this task on your own, transforming that bathroom fixture from a source of annoyance to a neat, sturdy installation. Stay with us as we reveal the step-by-step process, ensuring you can confidently and efficiently handle this common household challenge.
Tools Required
Removing a toilet paper holder with hidden screws is tricky. It requires patience and the right tools. The process isn’t difficult, but having the correct equipment makes it easier. This guide will help ensure a smooth removal process.
Before starting, gather the tools needed for the job. These tools are essential for a hassle-free experience.
1. Screwdriver
A screwdriver is necessary to remove screws. A flathead or Phillips screwdriver is typically required. Check the screw type to choose the right one.
2. Allen Wrench
An Allen wrench is useful if the holder uses hex screws. Keep a set of different sizes handy. This ensures you have the correct fit.
3. Flashlight
A flashlight helps locate hidden screws. It provides light in dim areas. Proper lighting ensures you see every detail.
4. Tape
Use tape to mark screw locations. This prevents confusion. It keeps track of where to focus your efforts.
5. Cloth Or Rag
A cloth or rag is useful for cleaning. Wipe away dust or debris. This ensures a neat working area.
These tools are simple yet effective. They make the process straightforward and manageable. Preparing properly saves time and effort.

Credit: www.reddit.com
Identifying Hidden Screws
Removing a toilet paper holder with hidden screws can be tricky. Many models hide screws for a sleek look. Identifying these screws is the first step in removal. It requires keen observation and a little patience.
Look For Concealed Caps
Check if the holder has decorative caps. These often hide screws. Gently press or twist these caps to reveal the screws. Some caps may snap off easily. Others might require a gentle pry with a flat tool.
Inspect Underneath The Brackets
Examine the underside of the holder’s brackets. Hidden screws are sometimes placed here. Use a flashlight for better visibility. Feel for small openings or slots. These often indicate screw locations.
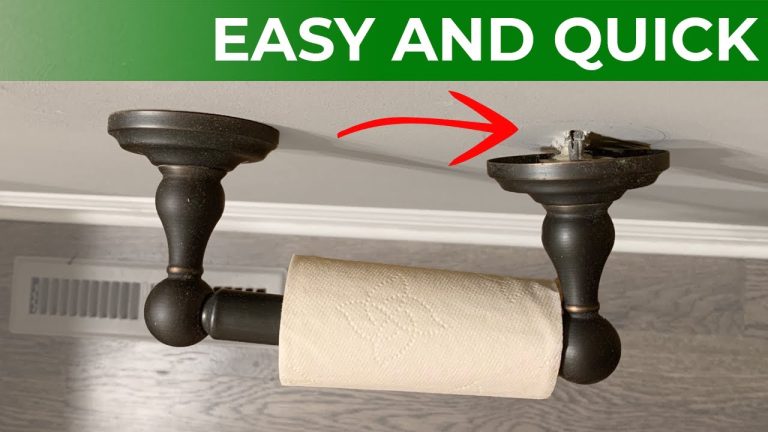
Check For Set Screws
Some holders use set screws for mounting. These screws are tiny and hidden in plain sight. Look at the base of the holder arms. Use an Allen wrench to loosen these screws. This can help in removing the holder without damage.
Observe For Seam Lines
Seam lines can indicate where parts join. These lines may hide screws or clips. Run your fingers along the holder. Feel for any separations or loose parts. This may reveal hidden screws.
Use A Mirror For Hard-to-see Areas
A small mirror can help spot screws. Place it behind the holder for a better view. Reflect light on the holder’s backside. This technique reveals screws you might miss otherwise.
By identifying hidden screws, you simplify the removal process. It prevents damage and ensures a smooth disassembly. Remember, a careful inspection is key.
Loosening The Holder
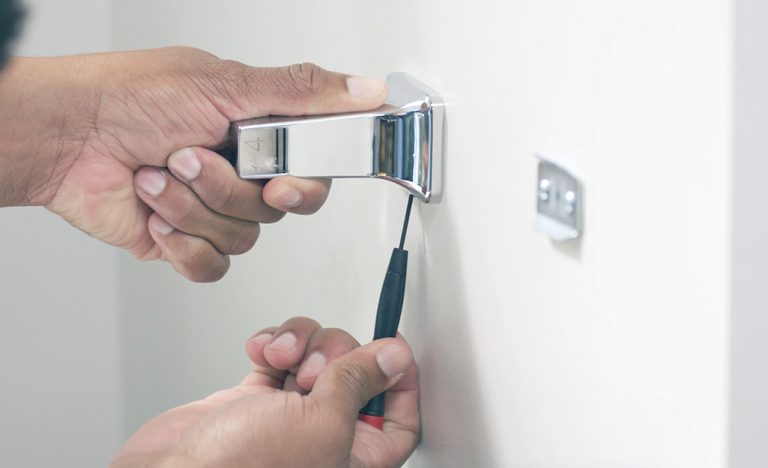
Removing a toilet paper holder with hidden screws can be tricky. Find the screws by locating small openings or slots. Use a screwdriver to gently loosen and detach the holder.
Loosening the holder of a toilet paper dispenser with hidden screws can seem daunting, but it’s not as tricky as it appears. Hidden screws are used to give a sleek look, but they can be a bit of a puzzle. Understanding the process will save you time and prevent damage to your bathroom fixtures.Using The Right Screwdriver
First, you need the right tools. A small flathead or Phillips screwdriver often does the trick. Check the screw type by gently examining the holder’s underside or side. If you’re unsure, a multi-bit screwdriver is a handy investment. It offers versatility, ensuring you have the right fit for different screws. Using the wrong screwdriver can strip the screws, making removal a nightmare.Handling Different Holder Types
Toilet paper holders come in various designs. Some might have a spring mechanism, while others are fixed with screws. If your holder has a spring-loaded bar, remove it first. For holders with a cover plate, gently pry it open to reveal the screws. Wall-mounted holders usually have a set screw under the arm or bracket. Unscrew these to loosen the holder. Different materials require different handling. Metal holders might need a bit more force, while plastic ones require a gentle touch. Have you ever tried removing a plastic holder only to crack it? Patience is key. If you encounter resistance, don’t force it. Consider checking for hidden screws or additional securing mechanisms. By understanding these nuances, you ensure a smooth removal process without damaging your bathroom aesthetics. Remember, the goal is to keep the holder and wall intact for future use. Have you ever found a surprise screw or hidden latch? It’s like solving a small mystery right in your bathroom!Removing The Holder
Removing a toilet paper holder with hidden screws might initially seem like a daunting task. However, with a little patience and the right approach, you can easily tackle this home improvement challenge. Whether you’re looking to update your bathroom’s look or simply need to make repairs, understanding the steps to remove the holder is essential.
Sliding The Holder Off
First, examine the holder closely to identify any movable parts. Often, holders with hidden screws have a mechanism that allows them to slide off from their base. Gently try to slide the holder horizontally. You might be surprised how easily it comes off when you apply the right pressure.
Using a flashlight can help you see any tiny latch or hook that keeps the holder in place. If you’re lucky, it may just be a matter of sliding it in the correct direction. Have you ever stumbled upon a solution simply by taking a closer look?
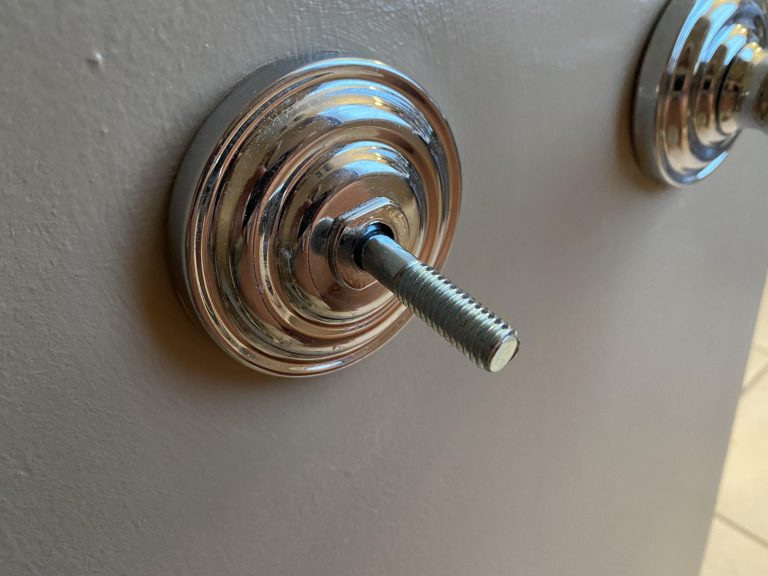
Pulling Away From The Wall
Once you’ve successfully slid the holder off, the next step is to pull it away from the wall. You might notice some resistance if it’s been in place for a long time. Don’t let this deter you. A gentle, steady pull can work wonders.
Consider using a thin flathead screwdriver to gently pry it away from the wall. If you’ve ever had to pry open a stubborn lid, you’ll know the satisfaction that comes with seeing it finally release. Remember, patience is key. Are you ready to give it a try and see how easy it can be?
These steps will guide you through removing a toilet paper holder with hidden screws. With a little patience and curiosity, you can simplify the process and make way for whatever comes next, be it a new holder or a fresh coat of paint. What other hidden gems will you uncover in your home improvement journey?
Cleaning The Area
Removing a toilet paper holder with hidden screws requires a few simple steps. First, locate the hidden screws by gently examining the holder’s base. Next, use the appropriate tool, usually a screwdriver, to unscrew and detach the holder from the wall.
Cleaning the area after removing your toilet paper holder is essential for a fresh start. It’s easy to overlook this step, but it makes a difference when you install the new holder. A clean surface ensures better adhesion and a more professional look.Removing Residual Adhesive
Start by examining the wall for leftover adhesive. It often lurks around the edges or where the holder was mounted. Use a damp cloth with mild soap to soften the sticky residue. A plastic scraper can be your best friend here. It gently lifts the adhesive without damaging your wall. If the residue is stubborn, try a mixture of vinegar and baking soda. It’s a natural solution that works wonders.Preparing For New Installation
Now that the area is clean, it’s time to prep for your new holder. Consider the current state of the wall. Is there a need for touch-up paint or a small repair? Address these issues before moving forward. Think about the placement of your new holder. Is it convenient for you and other users? You might find that moving it slightly can enhance accessibility. Evaluate the tools you’ll need for installation. A level, drill, and screws are often necessary. Ensure everything is ready to avoid last-minute stress. Having a clear plan makes the process smooth and efficient. What insights have you gained from cleaning and preparing your space? Reflect on this as you continue with your renovation.
Credit: www.youtube.com
Common Mistakes
Many often forget to locate the hidden screws. This can lead to frustration and difficulty during removal. Another common mistake is using excessive force, which may damage walls or fixtures.
Removing a toilet paper holder with hidden screws can be a simple task if done correctly, but many people make common mistakes that complicate the process. These errors often lead to unnecessary frustration and damage. Understanding these pitfalls can save you time and effort.Forcing The Holder
One of the most frequent mistakes is forcing the holder off the wall. You might think that a bit of muscle is needed to yank it free, but this can damage both the holder and the wall. Instead, take a moment to gently wiggle the holder. This slight movement can reveal where the hidden screws are located. Patience is key here. Have you ever tried to open a jar by sheer force only to find it spills everywhere? The same principle applies—less force, more finesse.Using Incorrect Tools
Grabbing the wrong tool can lead to stripped screws or even cracked holders. Often, people reach for the nearest tool instead of the right one. A small Allen wrench or a flathead screwdriver is usually what’s needed. Check beforehand what type of screw is hiding in your holder. Imagine trying to bake a cake with a fork instead of a whisk. The end result won’t be pretty. The same goes for using mismatched tools in your DIY tasks. Have you ever found yourself stuck because you didn’t have the right tool? Share your tool mishap stories in the comments! Avoid these common mistakes, and you’ll find removing your toilet paper holder is easier than you thought. What strategies have worked for you?Troubleshooting Tips
Discover how to remove a toilet paper holder with hidden screws. Use a small flathead screwdriver to locate and press the release button or latch underneath the holder. Gently pull the holder away from the wall.
Removing a toilet paper holder with hidden screws can sometimes feel like an impossible puzzle. But don’t worry, even if you’re not a DIY expert, you can tackle this task with a few clever tricks. In this section, we’ll dive into troubleshooting tips to help you navigate common challenges that might arise during the process.Dealing With Stubborn Screws
Ever faced a screw that refuses to budge? You’re not alone. Stubborn screws are a common hurdle, but patience and the right tools can make all the difference. First, ensure you’re using the correct screwdriver. A mismatched tool can strip the screw head, making things worse. If the screw still won’t move, try applying a bit of penetrating oil. Let it sit for a few minutes to loosen the grip. Have you ever thought about using a rubber band for extra grip? Place it between the screwdriver and the screw head; this simple trick can provide the friction needed for a successful turn.Preventing Wall Damage
You might worry about damaging your wall in the process. It’s a valid concern, and taking precautions is key. Start by gently wiggling the holder to assess how tightly it’s secured. This can help you plan the safest removal method. Consider using a putty knife to carefully pry the holder away from the wall. Doing so minimizes the risk of pulling off paint or drywall. Remember, slow and steady wins the race. Rushing can lead to unnecessary damage, turning a simple task into a costly repair. If you’re anxious about potential holes, think about patching kits available at hardware stores. They’re designed for quick fixes and can be a lifesaver in maintaining your wall’s appearance. Have you ever tackled a home project and learned something new? Share your experience in the comments. Your tips could help someone else avoid a similar mistake. By addressing these troubleshooting tips, you can confidently approach the task of removing your toilet paper holder, ensuring both success and a clean finish.
Credit: www.reddit.com
Frequently Asked Questions
How Do You Locate Hidden Screws In A Toilet Paper Holder?
To locate hidden screws, look for a small notch or cover on the holder. Gently pry it open with a flat tool. Hidden screws are usually underneath or behind these covers. Once located, use the appropriate screwdriver to loosen and remove them for easy disassembly.
What Tools Are Needed To Remove Hidden Screws?
To remove hidden screws, you’ll typically need a flathead screwdriver or a small Allen wrench. These tools help access and unscrew hidden fixtures. Always ensure the right size to avoid damaging the screws or holder. Having a flashlight can also help in locating screws.
Can I Remove A Toilet Paper Holder Without Damaging The Wall?
Yes, you can remove it without damage by carefully unscrewing the hidden screws. Use appropriate tools and gentle pressure to avoid harming the wall. Once the screws are removed, gently pull the holder away. Patch any small holes with wall filler if necessary.
How Do I Reinstall A Toilet Paper Holder?
Reinstalling involves aligning the holder with the previous screw holes and securing it. Insert screws back into place using a screwdriver. Ensure the holder is level before tightening fully. Test its stability by gently pulling it to ensure it’s securely attached.
Conclusion
Removing a toilet paper holder with hidden screws is simple. Start by gathering the right tools. Then, locate the hidden screws. Carefully unscrew them using a screwdriver. Be gentle to avoid damage. Keep the screws in a safe place. Reinstalling is just as easy.
Reverse the steps you followed. Remember to tighten the screws securely. This ensures the holder stays firm. Now, you know how to handle the task. With patience and the right steps, it’s straightforward. Enjoy the new look of your bathroom!

Home Improvement Specialist & Writer at HomeFixio
Caden Rutherford is a seasoned home improvement specialist with extensive hands-on experience in residential construction, renovations, and design. With a keen eye for detail and a passion for transforming spaces, Caden shares practical advice and expert solutions to enhance the functionality and beauty of homes. As a writer for HomeFixio, Caden combines technical knowledge with creative flair, providing readers with informative guides on everything from structural improvements to aesthetic upgrades, empowering homeowners to achieve their ideal living spaces.