How to Install a Wall Sconce Light: Step-by-Step Guide
Imagine transforming your living space with just a touch of elegance and style. Installing a wall sconce light can do just that, offering both functionality and a warm ambiance to any room.
You might think that adding a sophisticated lighting fixture involves complicated procedures or professional help, but it’s easier than you think. This guide will simplify the process for you, showing you step-by-step how to install a wall sconce light effortlessly.
Whether you’re updating your home decor or adding a touch of charm to a specific area, this article will empower you to take control of your home lighting. Ready to make your space shine? Let’s dive in and illuminate your home with confidence!
:strip_icc()/installing-box-wall-sconce-f811a056-b291f0391da74ea598c7f151b6b64ac5.jpg)
Credit: www.bhg.com
Choosing The Right Wall Sconce
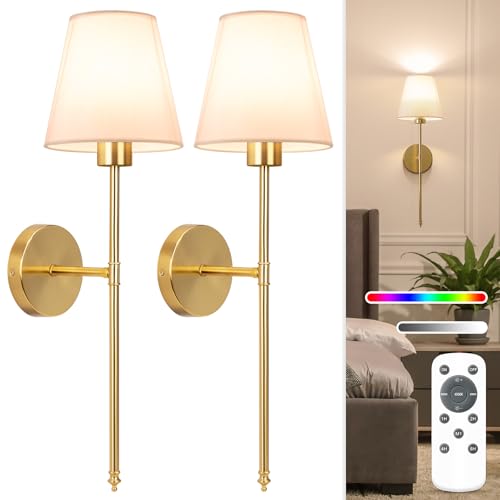
Wall sconces come in many styles and designs. Traditional styles have classic shapes and soft colors. Modern designs use bold shapes and bright finishes. Match the sconce style with your room’s look. Think about the materialtoo. Metal gives a sleek look. Glass adds elegance. Both can be beautiful. Choose what fits your taste best.
Size matters for wall sconces. Large sconces suit big rooms. Small ones fit tight spaces. Measure the wall before buying. Placement is key. Put sconces at eye level. This helps light spread evenly. Consider the distancefrom furniture. Avoid placing too close or too high. Proper placement creates a cozy atmosphere.
Gathering Necessary Tools And Materials
A screwdriveris needed to tighten screws. Keep a drillhandy for making holes. Make sure you have a levelto ensure straight installation. Bring a voltage testerto check electrical safety. A wire cutterwill help trim wires.
Gather a wall sconce light fixture. Have some screwsready for mounting. Ensure you have the correct wiring. Secure a mounting platefor a solid base. Keep electrical tapenearby for safety.
Preparing For Installation
Safety is very important. Always put safety first. Wear protective gloves and goggles. Avoid touching sharp tools. Use a sturdy ladder. Keep your work area tidy.
Turn off the electricity before you start. Go to your home’s circuit breaker. Find the right switch. Flip it to the “off” position. Double-check that the power is off. Use a voltage tester. Safety matters. Always be sure.
Marking The Installation Spot
Measuring for Accuracyis very important. Use a tape measure for this step. The sconce should be at eye level. Measure from the floor to your eye level. Mark this spot with a pencil. Ensure the spot is centered on the wall.
Using a Stud Finderis helpful. Locate the studs in the wall. Place the stud finder flat on the wall. Move it left and right slowly. It will beep when it finds a stud. Mark the studs with a pencil. These marks help later. Avoid marking too many spots. Keep the wall clean and tidy.
Installing Electrical Box
Installing an electrical box for a wall sconce light involves careful planning and basic wiring. Begin by selecting a suitable location on the wall. Secure the electrical box firmly and connect the wires according to safety standards. Ensure everything is properly aligned for a polished finish.
Cutting The Hole
First, mark the wall where the electrical box will go. Use a pencil to draw the shape of the box on the wall. Next, cut along the lines with a drywall saw. Be careful not to cut too deep. This is important to avoid damaging wires. The hole must be the right size for the box.
Securing The Box
Place the electrical box in the hole. Make sure it fits snugly. Use screws to secure it to the wall. Tighten the screws until the box is stable. Check that the box does not move. This ensures a safe and solid installation. Always double-check your work to prevent future problems.
:max_bytes(150000):strip_icc()/SPR-how-to-install-wall-sconce-5221961-step-09_30490-846de9413ad9417bacd9df575eb0e8ca.jpg)
Credit: www.thespruce.com
Connecting Wiring
Installing a wall sconce light involves connecting wiring safely. Start by turning off power to the area. Then, attach the sconce’s wires to the wall’s wires, matching colors. Secure connections with wire nuts and install the fixture. Restore power and test the light.
Understanding Wire Colors
Wires have different colors. Each color has a meaning. Black is usually the hot wire. It carries electricity to the light. White is the neutral wire. It takes electricity back to the source. Green or bare wires are ground wires. They keep you safe from shocks. Always check your manual for any special instructions.
Joining Wires Securely
Twist the wires together tightly. Use a wire nut to cover them. Make sure it fits snugly. Tug the wires gently. This checks if they are secure. No wires should be showing. Keep them inside the nut. If wires slip, redo the twist. Safety is very important.
Mounting The Wall Sconce
Mounting a wall sconce involves securing the fixture to the wall and connecting the wires. Choose a sturdy location and ensure the circuit is off for safety. Follow the instructions to attach the fixture, then test the light to confirm proper installation.
Attaching The Bracket
First, find the perfect spot on your wall. Use a pencil to mark the spot. Next, hold the bracket up to the mark. Make sure it is level. Use a drill to make holes for the screws. Place the bracket on the wall and align it with the holes. Insert the screws and tighten them with a screwdriver. Now, the bracket should be secure and ready.
Securing The Fixture
Take the sconce fixture and connect it to the bracket. Align it carefully. The fixture should fit snugly onto the bracket. Use the provided screws to attach the fixture. Tighten the screws so the fixture does not wobble. Double-check to ensure everything is secure. Your wall sconce is now mounted firmly.
:strip_icc()/wiring-sconce-wall-57050bbb-c18708d4bb7749a1b12ec37c985543cb.jpg)
Credit: www.bhg.com
Testing The Light
Installing a wall sconce light enhances the room’s ambiance. Start by choosing a suitable location and securing the mounting bracket. Connect wires correctly, ensuring the fixture is stable. Finally, test the light to confirm proper installation.
Restoring Power
Turn the power back on carefully. It’s important to ensure safety first. Restore power using the switch or breaker. Make sure everything is connected correctly. Check connections to avoid any faults.
Checking Functionality
Observe the light. Does it turn on? If not, check the bulb. Replace the bulb if needed. Ensure the bulb is screwed tightly. Check the wiring again. Look for any loose wires. Test the switch to confirm it’s working. Everything should be in place. Ensure safety is prioritized throughout.
Frequently Asked Questions
How Do I Choose The Right Wall Sconce?
Choosing the right wall sconce involves considering your room’s style and lighting needs. Measure the space to ensure proper fit. Decide on the light’s function: ambient, task, or accent lighting. Consider the sconce’s design, material, and color to complement your decor.
Check electrical compatibility and installation requirements.
What Tools Are Needed For Installation?
To install a wall sconce, you’ll need a screwdriver, drill, wire stripper, and voltage tester. You may also need wall anchors and a level. Gather these tools before starting to ensure a smooth installation process. Always follow safety guidelines and switch off the power before beginning.
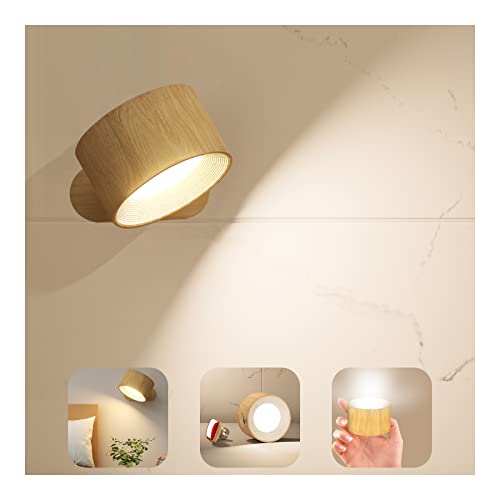
Can I Install A Sconce Without Wiring?
Yes, you can install a plug-in wall sconce without wiring. Plug-in sconces are ideal for renters or non-technical installations. They require an electrical outlet nearby and offer flexibility in placement. Use adhesive hooks or brackets for wall mounting. Always follow the manufacturer’s instructions for best results.
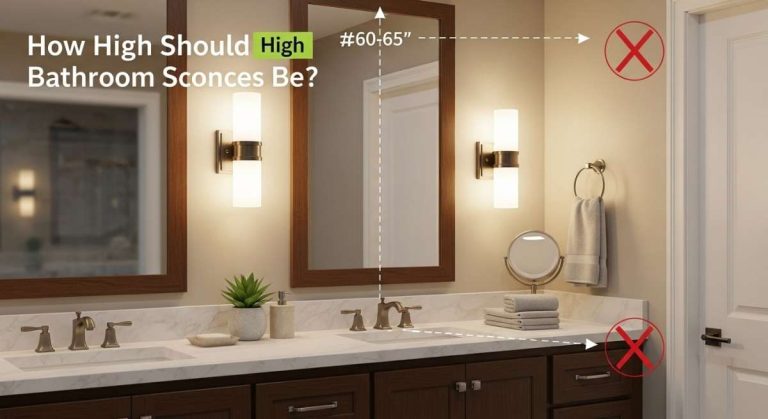
How High Should A Wall Sconce Be Mounted?
Wall sconces should be mounted 60 to 72 inches from the floor. This height ensures optimal lighting and prevents glare. Consider the room’s ceiling height and the sconce’s purpose. In bathrooms, mount sconces at eye level for even illumination. Adjust based on personal preference and room design.
Conclusion
Installing a wall sconce light is straightforward. Follow the steps, and you’ll succeed. Safety first: turn off the electricity. Gather your tools and materials. Carefully read the instructions. Mount the bracket securely. Connect the wires correctly. Attach the sconce to the wall.
Finally, test the light switch. All done! Now enjoy the warm glow. A well-lit space enhances your home. Feel proud of your handiwork. You did it yourself! If needed, seek help from a professional. Happy lighting!

Home Improvement Specialist & Writer at HomeFixio
Caden Rutherford is a seasoned home improvement specialist with extensive hands-on experience in residential construction, renovations, and design. With a keen eye for detail and a passion for transforming spaces, Caden shares practical advice and expert solutions to enhance the functionality and beauty of homes. As a writer for HomeFixio, Caden combines technical knowledge with creative flair, providing readers with informative guides on everything from structural improvements to aesthetic upgrades, empowering homeowners to achieve their ideal living spaces.