
How to Make Bean Bag Boards: DIY Guide for Beginners
Are you ready to transform your backyard into the ultimate hangout spot? Imagine the laughter, friendly competition, and unforgettable moments shared with friends and family as you dive into the world of bean bag board games.
Making your own bean bag boards is not just a fun project, but a chance to customize your outdoor experience. You don’t need to be a DIY expert to create something amazing—just a little guidance, some basic materials, and your creative flair.
You’ll discover step-by-step instructions, handy tips, and clever tricks to craft the perfect bean bag boards. Get ready to unleash your creativity and impress your guests with a game that everyone will love. Keep reading to find out how simple it can be to make your outdoor space the talk of the neighborhood.
Materials Needed
Creating your own bean bag boards is a fun and rewarding project. Before you start, gather all the essential materials. Having everything ready will make the process smoother. You’ll find that with the right tools and supplies, crafting a durable and stylish board is easy.
Wooden Boards
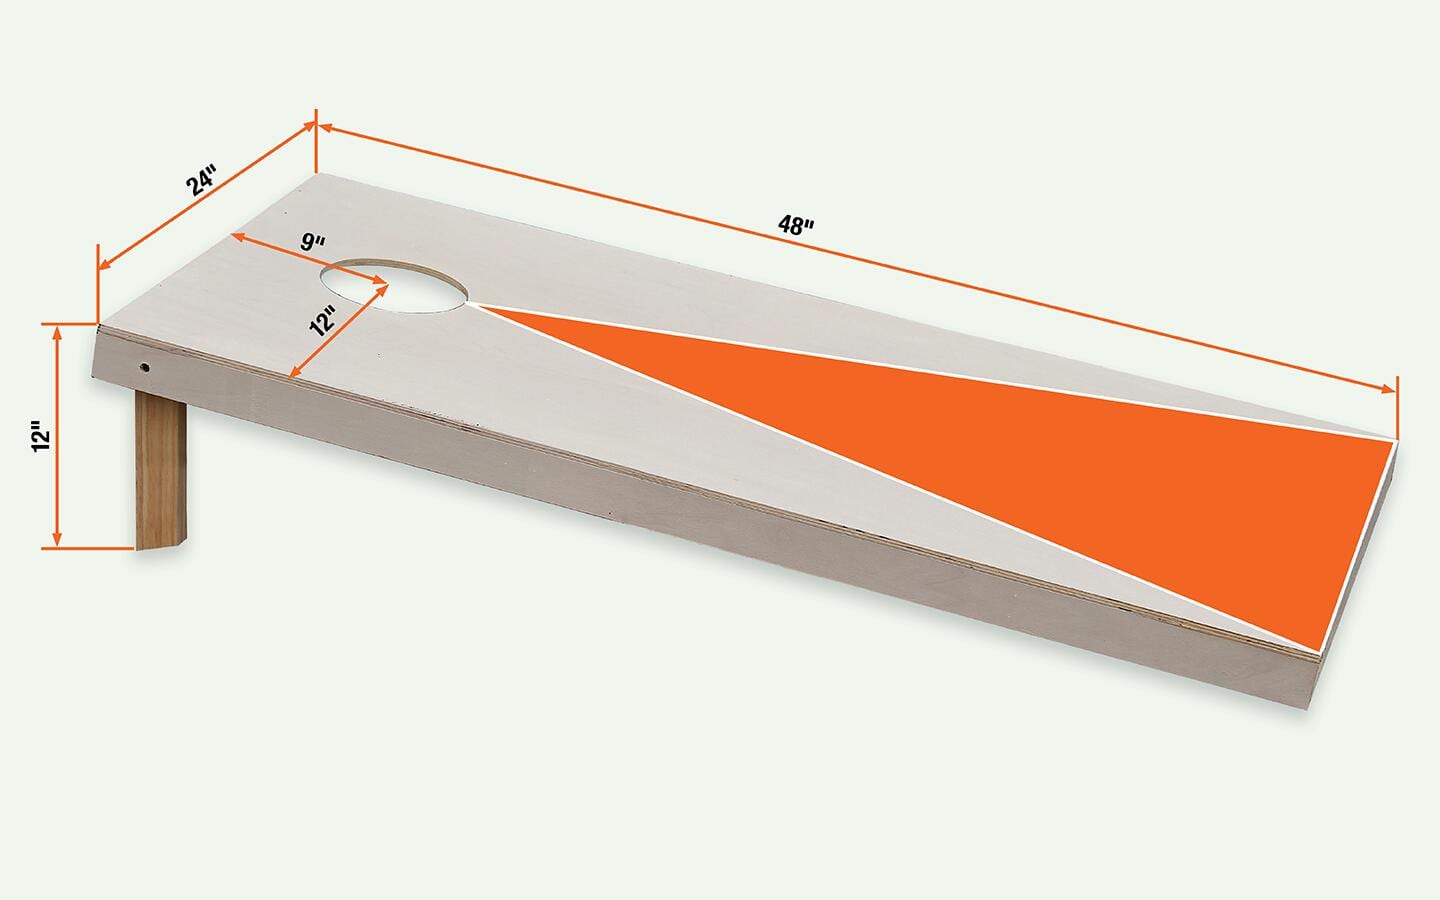
Choose two pieces of plywood, each measuring 24×48 inches. Ensure they are smooth and free of cracks. This size is standard for bean bag boards. It provides a good playing surface for the game.
Wood For Frames
Select sturdy wood for the frame. Two-by-fours are ideal. They offer strength and stability for your boards. Cut them to fit the edges of the plywood. This will frame the boards securely.
Wood Screws
Use wood screws to attach the plywood to the frame. Ensure the screws are long enough to penetrate both pieces. This will keep the board and frame together firmly. Secure fastening is crucial for durability.
Sandpaper
Sandpaper is essential for smoothing the plywood. Choose coarse and fine grits. Begin with coarse to remove rough spots. Finish with fine for a smooth surface. This ensures a safe and pleasant playing experience.
Paint And Brushes
Select outdoor paint for durability. Choose colors you like or match a theme. Use brushes for even paint application. Painting adds personality and protects the wood from weather.
Varnish
Varnish your boards for a glossy finish. It protects the paint and wood. Use a clear, outdoor varnish. Apply a few coats for the best protection. Let each coat dry completely before adding another.
Tools
You’ll need basic tools like a drill, saw, and screwdriver. A jigsaw is useful for cutting the hole. These tools make the construction process efficient. Ensure they are in good working order for safety.
Choosing The Right Wood
Choosing the right wood is crucial for crafting durable bean bag boards. The wood’s quality affects the boards’ longevity and playability. A solid choice ensures the boards withstand outdoor conditions. It also impacts the overall look and feel of your game.
Understanding Different Types Of Wood
Various woods are available for your bean bag boards. Each type offers unique benefits. Plywood is a popular choice. It’s affordable and easy to work with. Oak and maple provide a more premium feel. They are sturdy and have a beautiful grain.
Considering Wood Thickness
Wood thickness affects the board’s strength and stability. A minimum of 1/2 inch thickness is recommended. This ensures the boards are robust and can handle frequent play. Thicker wood provides more durability and a solid surface.
Evaluating Wood Finish
The finish on the wood is important. It protects the boards from moisture and damage. A smooth finish improves the bean bags’ slide. Choose a finish that suits your aesthetic preferences. It should also enhance the wood’s natural appearance.
Budget Considerations
Budget plays a role in wood selection. Plywood is cost-effective and offers good quality. Hardwood options like oak are more expensive. They offer a premium look and feel. Determine your budget before deciding.
Environmental Impact
Sustainability is a growing concern for many. Consider woods that are sustainably sourced. This helps protect forests and supports eco-friendly practices. Look for certifications indicating responsible sourcing. Ensure your choice aligns with your values.
Cutting The Boards
Creating bean bag boards at home can be a fun and rewarding project. One of the most crucial steps is cutting the boards. Precise cutting ensures your boards function properly and look great. Understanding the dimensions and safety precautions will make this process easier.
Measuring Dimensions
Start by measuring the exact size needed for your bean bag boards. Standard boards are typically 24 inches wide and 48 inches long. Use a tape measure for accurate results. Double-check your measurements before marking the wood. This step prevents mistakes and wasted material.
Safety Tips For Cutting
Safety should be a priority when cutting wood. Always wear safety goggles to protect your eyes. Use gloves to prevent splinters and cuts. Keep your workspace clear of clutter. Use clamps to secure the wood. This prevents slipping during cutting. Ensure your saw blade is sharp. A dull blade can be dangerous and cause uneven cuts.
Follow the manufacturer’s instructions for your tools. This will ensure safe operation. Keep your hands away from the blade. Always cut away from your body. If you’re using a power saw, unplug it when not in use. This prevents accidental activation.
Credit: www.homedepot.com
Assembling The Frame
Craft the frame by joining wooden pieces with screws. Make sure the corners are square. This will ensure a solid base for your bean bag boards.
Assembling the frame is crucial in making bean bag boards. It provides stability and durability. A well-constructed frame ensures smooth gameplay. This guide covers tools and steps for easy assembly.Tools Required
Gather necessary tools before starting. You’ll need a screwdriver and a hammer. A drill can speed up the process. Use a measuring tape for accuracy. Sandpaper smooths rough edges. Ensure you have safety goggles.Step-by-step Assembly
First, lay out all the wooden pieces. Ensure they are cut to the right size. Next, connect the side panels to the base. Use screws to secure them tightly. Drill holes for a better fit. Check alignment frequently. Now, attach the back panel. Ensure it sits flush with the base. Secure with screws. Use a level to check balance. Adjust as necessary. Sand any rough edges. Finally, reinforce joints for extra stability. Add corner brackets if needed. Double-check all connections. Make sure everything is tight and secure. Your frame is now ready.Creating The Top Surface
Creating the top surface of a bean bag board is crucial. This part of the board is where the bags land. A smooth surface ensures the game is fun and fair. Proper preparation here enhances durability and appearance.
Sanding The Surface
Start by sanding the board’s surface. Use sandpaper with medium grit. This removes rough spots and imperfections. Sand in a circular motion. A smooth surface makes the game enjoyable. After sanding, clean the surface. Remove all dust and debris for a neat finish.
Drilling The Hole
The hole on the bean bag board is essential. It is the target for the bags. Measure the center of the board carefully. Mark the spot for drilling. Use a drill with the correct bit size. Drill slowly to avoid splintering. A clean hole ensures smooth play. After drilling, sand the edges for safety.

Credit: www.youtube.com
Painting And Finishing
Painting and finishing your bean bag boards adds personal flair. It protects the wood and enhances durability. This stage requires creativity and attention to detail. Start with a clean, smooth surface. Sand the boards thoroughly. Remove any dust and debris. Now, you are ready to paint.
Choosing Paint Colors
Select colors that reflect your style. Bright colors make the boards stand out. Consider your surroundings or favorite team colors. Use outdoor acrylic paints for durability. They hold up well against weather conditions. Test colors on a small area first. Ensure they look as expected.
Applying Finishing Touches
Apply a clear sealant after painting. This protects the paint and wood. Choose a sealant suitable for outdoor use. Apply it evenly with a brush or roller. Let each coat dry fully. Consider adding decals or stickers for extra flair. Ensure they are weather-resistant. These final touches make your boards unique.
Making The Bean Bags
Crafting bean bag boards involves cutting wood pieces and assembling them accurately. Smooth surfaces and precise measurements ensure a perfect finish. Adding paint or decals personalizes the boards, making them unique for every game night.
Making the bean bags for your bean bag boards is a fun and creative process. Not only do you get to choose the colors and patterns, but you also have a say in how they feel and perform during the game. The right bean bag can enhance your playing experience, making each toss a satisfying shot. Let’s dive into the essentials of crafting your perfect bean bags.Selecting The Fabric
Choosing the fabric is your first step. The fabric should be durable enough to withstand repeated throws and outdoor elements. Canvas and duck cloth are popular choices because they are strong and wear-resistant. Consider the aesthetics as well. Bright colors and fun patterns can make your game more inviting. Also, think about how the fabric feels in your hand. A fabric that is too smooth might slip, while something with a bit of texture provides a better grip.Filling Options
The filling of your bean bags can drastically alter the playing experience. Traditional fillers include dried corn, which provides a classic feel and sound. However, if you want to avoid using organic materials, plastic pellets are a great alternative. They offer consistency and are weather-resistant. You could even experiment with mixing fillings to find a weight and feel that suits your style. Remember, the weight of the bean bag affects how far you can toss it. Do you prefer a heavier bag for stability or a lighter one for ease of throw? Have you ever considered the impact of different fillings on your game? Testing various options might just uncover the secret to your best toss yet.
Credit: awonderfulthought.com
Game Setup And Rules
Bean bag boards offer endless fun. Setting up the game is simple, and the rules are easy to follow. With a little preparation, you can enjoy hours of entertainment. Let’s dive into the setup and rules.
Setting Up The Boards
Find a flat surface. Ensure it’s free of debris. Place two boards 27 feet apart. Ensure they face each other. Each board should be stable. Avoid wobbling or tilting. This ensures fair play.
Basic Game Rules
Each player gets four bean bags. Players take turns throwing. Aim for the hole in the board. Scoring is simple. A bag in the hole scores three points. A bag on the board scores one point. Play until a player reaches 21 points.
Alternate turns after each round. Players can knock off opponents’ bags. Strategy is important. It’s all about accuracy and skill. Keep it friendly and competitive. Enjoy the game!
Frequently Asked Questions
What Materials Are Needed For Bean Bag Boards?
To make bean bag boards, you’ll need plywood, wood screws, and sandpaper. A saw, drill, and measuring tape are essential tools. Paint or varnish can be used for finishing. Bean bags require fabric and beans or pellets for filling.
How Do You Measure Bean Bag Boards?
Start by measuring a 2×4-foot rectangle on your plywood. Ensure the hole is centered 9 inches from the top edge. Accurate measurements are crucial for regulation-sized boards. Use a tape measure for precision.
What Is The Ideal Board Height?
The ideal height for a bean bag board is 12 inches at the back. This provides the correct incline. The front should be around 3 inches high. This helps ensure consistent gameplay.
How Do You Finish Bean Bag Boards?
Sand the surface to smooth any rough edges. Apply a coat of primer followed by paint or varnish. This protects the wood and adds aesthetic appeal. Allow sufficient drying time between coats.
Conclusion
Creating bean bag boards is a fun and rewarding project. You now have the steps to make your own. Gather your materials and get started. Enjoy the process and the game. Invite friends and family to join the fun. Celebrate your finished boards with friendly competitions.
Share your creations with others. Inspire them to try building their own boards. Your effort is worth it. Every toss will remind you of your work. Cherish the memories and laughter. You’ll find joy in playing and sharing. Start building today and experience the excitement.

Home Interior Design & Renovation Expert at HomeFixio
Sierra Wellington is a skilled home interior designer with extensive experience in plumbing, fittings, and home renovations. Having worked on numerous residential projects, Sierra specializes in creating functional and aesthetically pleasing spaces. With a keen eye for design and a deep understanding of the technical aspects of home improvement, he provides expert advice on everything from layout planning to fixture installations. As a writer for HomeFixio, Sierra shares his practical insights and creative solutions, helping homeowners elevate their spaces with precision and style.


