
How to Make Bean Bag: Easy DIY Guide
Imagine sinking into the perfect bean bag chair after a long day—soft, cozy, and tailored just for you. Why settle for store-bought when you can create something uniquely yours?
Making your own bean bag is easier than you think and offers a rewarding way to express your style. Whether you’re looking to add a splash of color to your living room or need a comfy spot for reading, crafting your own bean bag is the way to go.
Get ready to discover the secrets to making a bean bag that fits your taste and comfort needs perfectly. Let’s dive into the process that will have you lounging in homemade luxury in no time.
Materials Needed
Making a bean bag is a fun DIY project. It requires some basic materials. Choosing the right materials ensures comfort and durability. Let’s dive into the essentials you’ll need.
Fabric
Select a strong, washable fabric. Cotton or polyester works best. Choose a pattern that matches your room decor. Ensure the fabric is comfortable to touch.
Thread
Use a strong, matching thread. It helps in holding the fabric together. Choose a thread that matches the fabric color. Quality thread ensures the bean bag lasts longer.
Sewing Machine
A sewing machine speeds up the process. It provides neat and strong stitches. Ensure the machine is in good working condition. Adjust the settings for heavy fabric.
Beans Or Filling
Filling gives the bean bag its shape. Polystyrene beads or foam work well. Ensure you have enough to fill the bag. Check for any leaks or spills during filling.
Zipper
A zipper allows easy access to the filling. Choose a durable, long zipper. It should match the fabric color. A good zipper keeps the filling secure.
Scissors
Sharp scissors ensure clean cuts. Use them to cut fabric and thread. Ensure they are comfortable to handle. Keep them away from children.
Measuring Tape
Accurate measurements are crucial. Use a measuring tape for precision. Measure twice before cutting. It ensures a perfect fit for the fabric.

Credit: hungaricanjourney.com
Choosing The Fabric
Choosing the right fabric for your bean bag is crucial. It defines comfort and durability. The fabric impacts how the bean bag feels and lasts. Different fabrics offer different qualities. Consider factors like texture, color, and resistance. Let’s explore how to choose the best fabric for your bean bag.
Understanding Fabric Types
There are various fabric types available. Cotton is soft and breathable. It’s great for indoor use. Polyester is durable and easy to clean. Perfect for active households. Leather offers a sleek look. It’s luxurious but requires maintenance.
Evaluating Durability
Durability is vital for bean bags. A strong fabric withstands wear and tear. Look for tightly woven materials. They last longer and resist ripping. Check the fabric’s weight. Heavier fabrics often mean better durability.
Considering Comfort
Comfort is key for a bean bag. Soft fabrics enhance relaxation. Cotton and velvet are plush options. They provide a cozy feel. Test the fabric’s softness. Make sure it feels good against your skin.
Assessing Color And Style
Color and style affect the room’s vibe. Choose colors that match your decor. Neutral shades blend well. Bright colors add a pop. Consider patterns for a unique touch. Style should reflect your personality.
Checking Maintenance Needs
Maintenance affects your choice. Easy-to-clean fabrics save time. Polyester is stain-resistant. Leather needs regular care. Check if the fabric is machine washable. Consider how much effort you’re willing to invest.
Thinking About Environmental Impact
Some fabrics are eco-friendly. Organic cotton is sustainable. Recycled polyester reduces waste. Consider fabrics with low environmental impact. This choice supports a green lifestyle. Make mindful decisions for a healthier planet.
Selecting The Filling
Creating your own bean bag is an exciting venture, but selecting the right filling is crucial. The filling not only affects the comfort and support of your bean bag but also its durability and environmental impact. As you explore your options, consider the different types of fillings available and how they align with your needs and values.
Polystyrene Beads
Polystyrene beads are the most common choice for bean bags. These tiny beads provide a lightweight and bouncy feel, making your bean bag easy to move and shape. They are usually cost-effective, allowing you to fill large bean bags without breaking the bank.
However, keep in mind that polystyrene beads can flatten over time. You might need to refill your bean bag occasionally to maintain its plumpness. Are you ready to commit to regular maintenance for the comfort they provide?
Shredded Foam
Shredded foam offers a different experience. It creates a more cushioned and supportive feel, ideal for those who prefer a firmer seating option. It molds to your body shape, providing excellent comfort for long hours.
Remember, shredded foam tends to be heavier than polystyrene beads. Consider whether you need your bean bag to be easily movable or if stability is your priority. Can you handle the extra weight for the comfort it delivers?
Eco-friendly Options
If sustainability is close to your heart, eco-friendly fillings might be your best choice. Options like recycled foam or natural materials such as buckwheat hulls offer a guilt-free alternative to traditional fillings.
They may come at a higher initial cost, but their environmental benefits and durability can be worth the investment. Are you willing to spend a bit more to make a positive impact on the planet?
As you decide on the filling for your bean bag, weigh the pros and cons of each option. Each type offers unique benefits, and your choice should reflect your lifestyle and values. What will you choose to make your perfect bean bag?
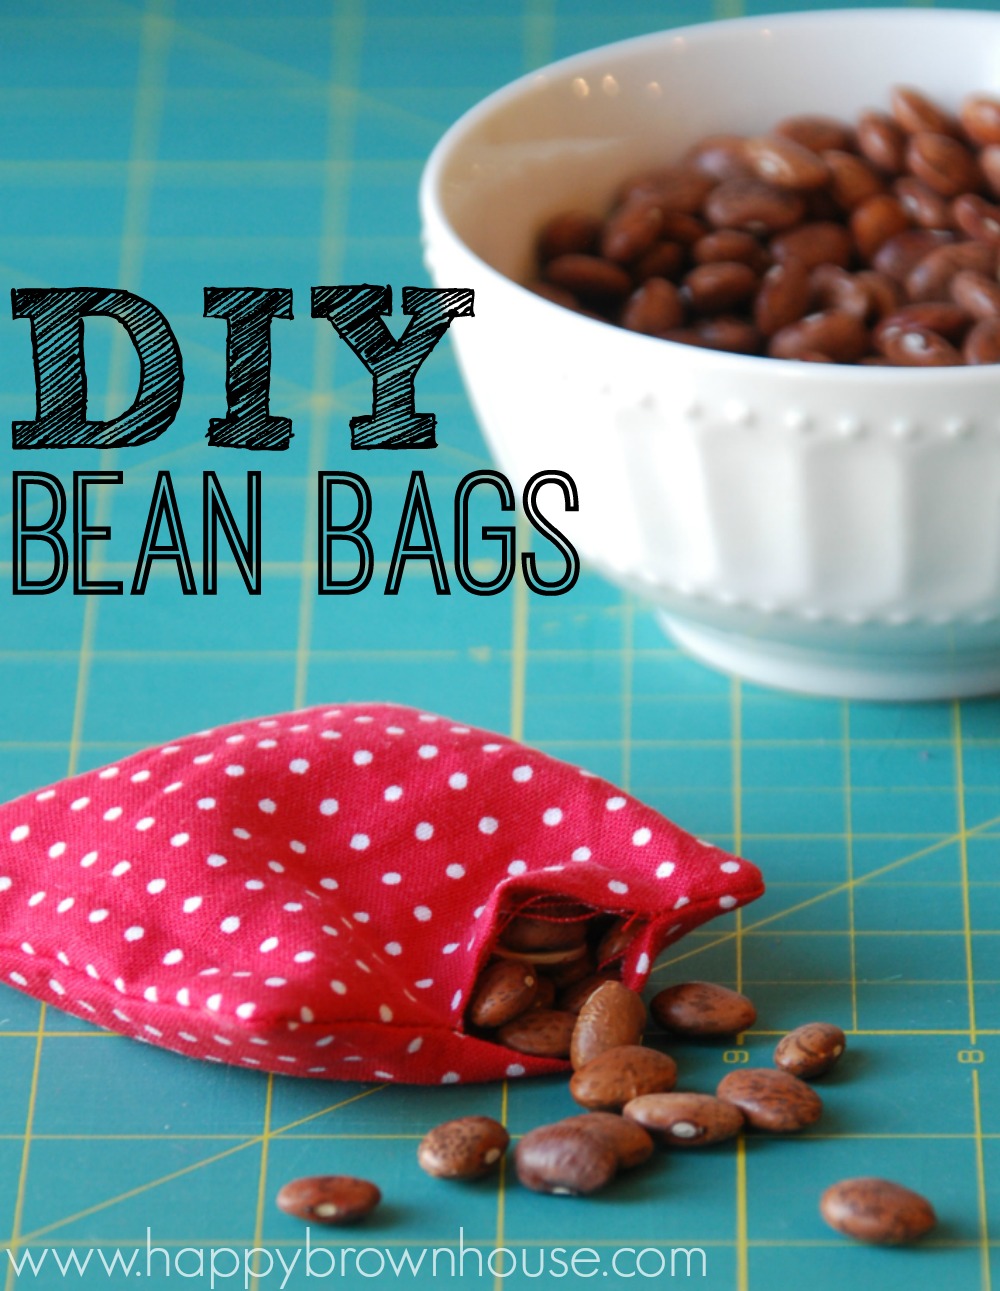
Credit: happybrownhouse.com
Cutting The Fabric
Creating your own bean bag is a fun and rewarding project. Cutting the fabric is an essential step in this process. Precise cuts ensure your bean bag looks great and lasts. This section covers how to measure dimensions and create the pattern for your bean bag.
Measuring Dimensions
Start by deciding the size of your bean bag. Consider where you’ll place it and who will use it. Use a tape measure to get accurate dimensions. Write these measurements down for reference.
Choose a fabric that suits your style. Ensure the fabric is durable and easy to clean. Measure the fabric twice to avoid mistakes. It’s better to have extra fabric than not enough.
Creating The Pattern
Create a simple pattern using paper or cardboard. This helps in cutting the fabric accurately. Draw the shape of your bean bag on the pattern material. Use your measurements to guide your drawing.
Cut out the pattern carefully. Lay the pattern on your fabric and secure it with pins. Trace around the pattern with chalk or a fabric marker. Ensure lines are clear and visible.
Cut the fabric along the traced lines. Use sharp scissors for clean edges. Double-check your cuts before removing the pattern. This ensures each piece fits perfectly when sewn.
Sewing The Pieces
Crafting a bean bag involves gathering durable fabric and filling it with soft material. Cut the fabric pieces, sew them together, and fill with foam beans for comfort. This simple DIY project adds cozy seating to any room.
Sewing the pieces of a bean bag is where creativity truly meets craftsmanship. It’s the stage where you bring together the carefully chosen fabric and transform it into a cozy haven. Imagine the satisfaction of stitching your panels and seeing your vision come to life. As you sew, think of the comfort and joy your bean bag will bring to your home. Ready to embark on this sewing journey? Let’s dive into the details.Stitching The Panels
Start with cutting your fabric into equal panels. Typically, you’ll need six pieces for a standard round bean bag. Each panel should have a curved shape to form the perfect spherical structure. Once your panels are ready, arrange them side by side. Match the edges carefully to ensure your bean bag has a smooth shape. Use pins to hold the panels in place, ensuring they don’t shift as you sew. A good stitch is crucial. Use a strong thread and a straight stitch for durability. If you’re using a sewing machine, adjust the settings to accommodate thicker fabrics. Hand stitching can work too if you’re patient and meticulous. Have you ever stitched something and realized it was inside out? Double-check the fabric sides before sewing. The right side should face inward, so when you flip it, the seams are hidden.Adding A Zipper
Adding a zipper is the trickiest part, but it’s necessary for refilling or cleaning. Choose a sturdy zipper that matches the length of your bean bag’s circumference. This ensures easy access without compromising the shape. Position the zipper along one panel’s seam. Pin it securely before sewing. This prevents the zipper from shifting and gives you a smooth finish. When sewing the zipper, go slow. Adjust your machine’s foot to zip mode for precision. If you’re sewing by hand, use small, tight stitches to secure the zipper in place. Ever struggled with a zipper that keeps getting stuck? Ensure the zipper teeth align perfectly. A misaligned zipper can be frustrating when you need to access the filling. Remember, your bean bag is not just furniture. It’s a piece of art that reflects your style and skill. Wouldn’t it be amazing to sit back and relax on something you created with your own hands?Filling The Bean Bag
Crafting a bean bag starts with filling it properly. Begin by choosing soft, durable filler, like polystyrene beads. Carefully pour the beads into the bag, ensuring even distribution for comfort and support.
Filling your bean bag is an essential step that can make or break its comfort and durability. While it may seem like a simple task, achieving that perfect balance of fluffiness and support requires a bit of know-how. Have you ever wondered why some bean bags feel just right while others fall flat? The secret often lies in how they’re filled.Ensuring Even Distribution
When adding filler to your bean bag, it’s crucial to focus on even distribution. You want each corner to feel just as comfy as the center. Start by placing the bean bag on a flat surface. Open the fabric cover and slowly pour the filler inside. To help with even distribution, gently shake the bean bag as you fill it. This encourages the filling to spread uniformly. You can also enlist a friend to hold the opening while you pour, making the process smoother and more efficient.Securing The Closure
Once you’re satisfied with the fill level, securing the closure properly is the next vital step. You definitely don’t want tiny beads spilling out every time you sit down. Check that the zipper is robust and functioning well. Some bean bags offer a double-zipper feature for added security. If your bean bag has a Velcro or button closure, ensure they are tightly fastened. You might even consider sewing a few stitches for extra reinforcement. This small step can make a significant difference in maintaining the bean bag’s integrity over time. Adding your personal touch to the filling process can make your bean bag uniquely yours. Have you ever tried mixing different types of fillers for varied support? Small tweaks can lead to surprising comfort. What’s your secret ingredient for the perfect bean bag?Personalizing Your Bean Bag
Personalizing your bean bag is a fun and creative process. It gives you the freedom to express your style. Whether you want something bold or subtle, it’s all up to you. A personalized bean bag adds charm to your living space. Let’s explore some ways to make your bean bag truly yours.
Adding Decorative Elements
Decorative elements can transform your bean bag. Use colorful fabrics or patterned covers. Choose designs that match your room’s theme. Consider adding buttons or embroidery for a classic touch. Fabric paints can offer vibrant, custom designs. Stencils help create precise shapes and patterns. Adding tassels or fringes gives a boho vibe. You can even sew on patches or badges for a trendy look.
Customizing For Comfort
Comfort is key for a bean bag. Choose fillings that suit your preference. Memory foam offers soft, molding support. Beans provide a lightweight, adaptable feel. Adjust the filling amount for desired firmness. Use additional cushions for extra support. A headrest can enhance relaxation. Choose breathable fabrics for a cool, comfortable seat. Consider adding a pocket for convenient storage. Your comfort choices make the bean bag uniquely yours.
:max_bytes(150000):strip_icc()/BeanBags1-5a3d6b21eb4d520037c7d90d.jpg)
Credit: www.thesprucecrafts.com
Maintenance Tips
Creating a bean bag requires careful planning and precise stitching. Choose durable fabric and ensure seams are tight. Use quality stuffing for comfort and longevity. Regularly check for wear and patch any holes promptly.
Maintaining your bean bag is key to ensuring its longevity and comfort. With a little attention, you can keep it looking fresh and feeling cozy. Whether it’s a quick clean or a refill, these simple tips can make all the difference in your bean bag’s lifespan. Let’s dive into practical ways to keep your bean bag in top shape.Cleaning The Fabric
Regular cleaning is essential to keep your bean bag spotless. Start by checking the fabric care label for specific cleaning instructions. Most bean bags come with removable covers which can be machine washed on a gentle cycle. If your bean bag doesn’t have a removable cover, spot cleaning is your best bet. Use a damp cloth with mild detergent to tackle stains. Avoid harsh chemicals that might damage the fabric. Consider the environment in which your bean bag resides. If it’s in a high-traffic area, more frequent cleaning might be necessary. Have you ever thought about how much dust accumulates over time? A quick vacuum can help keep it tidy between washes.Refilling The Bag
Over time, bean bags can lose their plumpness. Refilling them is a straightforward task that can breathe new life into your favorite seat. You’ll need to purchase refill beans, which are often available at home goods stores or online. Before refilling, lay down a large sheet or tarp to catch any stray beans. Carefully open the zipper and pour the new beans into the bag. Do you remember the satisfaction of seeing your bean bag regain its shape? It’s important not to overfill the bag. Too many beans can make it uncomfortable and hard to mold to your body. Aim for a balance that provides support without sacrificing comfort. Regular maintenance doesn’t just enhance your bean bag’s appearance; it boosts your enjoyment. With these simple tips, your bean bag can remain a beloved centerpiece in your home for years.Frequently Asked Questions
How Do I Choose The Right Bean Bag Fabric?
Choosing the right fabric depends on usage and location. For indoor use, cotton and velvet are cozy. For outdoor use, consider waterproof and durable materials like polyester or nylon. Consider the ease of cleaning and durability for high-traffic areas.
What Tools Do I Need To Make A Bean Bag?
You will need a sewing machine, scissors, measuring tape, and fabric chalk. Additional essentials include a zipper, fabric of your choice, and bean bag filling. Having these tools ensures a smooth and efficient crafting process.
How Much Filling Do I Need For A Bean Bag?
The filling amount depends on bean bag size. A standard size requires around 3-4 cubic feet of filling. Larger sizes, like loungers, may need up to 6 cubic feet. Adjust according to desired firmness.
Can I Wash A Homemade Bean Bag?
Yes, you can wash a homemade bean bag. Ensure the fabric is washable and remove the filling. Use a mild detergent for the cover. Air dry it to maintain the fabric quality.
Conclusion
Creating your own bean bag is simple and fun. With the steps given, you can make a cozy seat for your home. Enjoy customizing the fabric and filling. Personal touches make it special. Invite friends to help, turning it into a group activity.
Share your creation with others. Inspire them to make one too. Relax on your bean bag and appreciate your handiwork. It’s more than furniture—it’s a project you completed. Keep crafting and exploring new ideas. Your space reflects your creativity. Celebrate your new skills.
Feel proud of what you achieved.

Home Interior Design & Renovation Expert at HomeFixio
Sierra Wellington is a skilled home interior designer with extensive experience in plumbing, fittings, and home renovations. Having worked on numerous residential projects, Sierra specializes in creating functional and aesthetically pleasing spaces. With a keen eye for design and a deep understanding of the technical aspects of home improvement, he provides expert advice on everything from layout planning to fixture installations. As a writer for HomeFixio, Sierra shares his practical insights and creative solutions, helping homeowners elevate their spaces with precision and style.


