How to Make Seams at Intersections in Blender: Master Techniques
Are you tired of struggling with seams at intersections while working in Blender? You’re not alone.
Many 3D artists face this common yet frustrating challenge. But don’t worry—help is here. Imagine a workflow where your models come together seamlessly, without those pesky glitches that disrupt your creative vision. This guide will reveal tried-and-tested techniques that can transform your Blender projects.
You’ll learn step-by-step methods to create precise seams at intersections, making your models look polished and professional. Ready to elevate your 3D modeling skills and create stunning visuals that grab attention? Let’s dive into the secrets of mastering seams at intersections in Blender. Your projects deserve it.

Credit: www.blendernation.com
Seam Basics
Understanding seams is crucial in Blender for clean UV mapping. Seams define where a 3D model unwraps, helping textures fit accurately. Proper seam placement ensures textures look natural and avoid distortions.
Purpose Of Seams
Seams help in separating parts of a model for UV unwrapping. They allow you to control how the texture wraps around complex shapes. Without seams, textures can stretch or misalign. Proper seam placement enhances texture quality and realism.
Seam Tools In Blender
Blender offers several tools for seam creation. The Mark Seamtool lets you define edges as seams easily. Select edges and mark them to create precise seams. The Clear Seamtool removes unwanted seams. This helps in refining your UV layout.
Using the Edge Selectmode enhances seam marking. Navigate through the model to find the best seam locations. The UV Editorshows how seams affect your unwrapped model. Adjust seams to improve texture mapping.
Preparation Steps
Select the intersection edges in Blender using edge selection mode. Activate the marking seams tool to define seam lines. Adjust seam placement to ensure smooth transitions between intersecting surfaces.
In Blender, creating clean seams at intersections requires careful preparation. Preparation involves several steps to ensure a smooth workflow. Proper preparation sets a strong foundation for your project.Model Inspection
Begin by examining your 3D model carefully. Look for areas where seams may occur. Ensure all edges are visible and clear. Check for overlapping vertices or faces. These can cause issues later. Fix any geometry problems before proceeding. A well-inspected model saves time.Selecting The Right Faces
Choose the faces where seams will be created. Use Blender’s selection tools for precision. Ensure the selected faces form a coherent path. Avoid selecting too many faces at once. This can complicate the process. Focus on one section at a time. Proper selection ensures cleaner seams.Creating Seams
Creating seams in Blender involves selecting edges at intersections. This helps in managing texture mapping. Adjusting seam placement can improve texture appearance on 3D models.
Creating seams in Blender enhances your 3D model’s texture mapping. It helps define where your texture wraps around the model. Understanding seams is crucial for clean and professional texture work. This section guides you through selecting edges and marking seams effectively.Edge Selection
Begin by entering Blender’s Edit Mode. Press ‘Tab’ for quick access. Use the ‘Edge Select’ tool. It’s essential for picking the right edges. Click on edges that define the boundary of your desired seam. Hold ‘Shift’ to select multiple edges. Ensure the edges form a continuous loop. This prepares the model for seamless texture mapping.Marking Seams
With edges selected, proceed to mark them as seams. Navigate to the ‘UV’ menu. Choose ‘Mark Seam’ from the list. This tells Blender where to split the model for texturing. The marked edges turn red. This color indicates successful seam creation. Check for any gaps or incomplete loops. Adjust selections as needed for a flawless seam.
Credit: www.blendernation.com
Handling Intersections
Creating seams at intersections in Blender can improve your 3D models. Use the seam tool to carefully select edges. Ensure smooth transitions by aligning vertices and keeping the mesh clean.
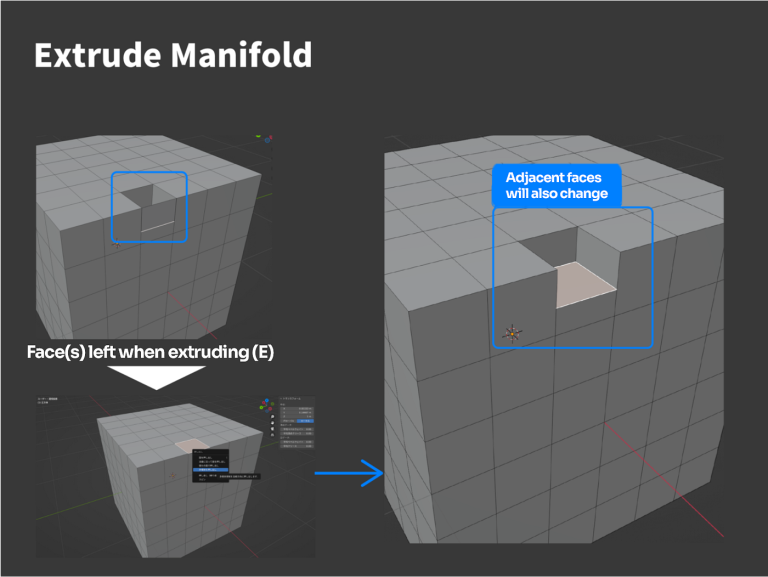
Handling intersections in Blender can be tricky. Seams at intersections require careful attention. Proper seam creation ensures a clean, professional look. Understanding geometry and overlaps is crucial. It enhances your final model’s quality. Let’s explore these aspects in detail.Complex Geometry
Intersections often involve complex geometry. Models with intricate details pose challenges. It’s essential to understand the shape’s structure. Analyze how different parts interact. This insight helps in seam placement. Recognize edges where surfaces meet. This is key to avoiding errors in the final model.Managing Overlaps
Overlapping elements can cause issues. They make seams harder to manage. Avoiding overlaps simplifies seam creation. Use tools to identify intersecting areas. This helps in addressing potential problems early. Once identified, adjust the geometry. It reduces the complexity of seam work. Proper management leads to smoother intersections and better results.Advanced Techniques
Creating seamless intersections in Blender can be a challenging task, especially when aiming for precision and detail. But once you master advanced techniques, the process becomes much smoother and rewarding. These methods not only enhance your skills but also increase the quality and realism of your 3D models. Let’s dive into two powerful techniques that can transform your workflow and output.
Using Uv Maps
UV mapping is a critical tool for any Blender artist. It allows you to project 2D images onto your 3D models, ensuring textures align perfectly at intersections. Start by unwrapping your model, carefully planning seams to avoid distortion.
Consider using the ‘Smart UV Project’ feature for complex models. It automatically places seams to optimize the mapping process. Adjust manually for crucial areas where precision is key.
Once your UV map is set, apply textures that fit seamlessly. Test different mapping methods like ‘Angle Based’ or ‘Conformal’ for better results. Have you ever noticed how a well-mapped texture can transform a model’s realism?
Utilizing Add-ons
Add-ons are powerful extensions that can streamline your modeling process. Blender’s community offers a plethora of options that enhance your workflow, especially at intersections.
Consider using the ‘UV Toolkit’ add-on for advanced UV mapping features. It provides tools for precise seam placement and texture alignment. This can be a game-changer for complex models.
Another useful add-on is ‘Magic UV’. It offers additional features like ‘Texture Checker’ to ensure your textures are correctly applied. Do you think an add-on could be the missing piece in your Blender toolkit?
Exploring these advanced techniques can elevate your Blender projects. With UV maps and add-ons, the possibilities are endless. What new approach will you try next?
Common Mistakes
Creating seams at intersections in Blender can be tricky. Many beginners make mistakes that lead to visible errors in their models. Understanding these common mistakes can improve your work.
Avoiding Distortion
Distortion often happens when seams are not aligned. Misalignment can stretch textures, making them look unnatural. To avoid this, ensure your seams follow the natural lines of the model. Check your UV map regularly. Look for any stretched areas. Adjust seams to minimize distortion. This keeps your model’s texture looking clean and professional.
Maintaining Seam Consistency
Inconsistent seams can disrupt a model’s appearance. Keep seam placement uniform across similar areas. This helps maintain a consistent look in your textures. Use symmetry tools in Blender. They help in placing seams evenly. Double-check your model from different angles. Ensure seams blend naturally with the model’s design. Consistent seams enhance the overall quality of your work.
Practical Tips
Creating seams at intersections in Blender can be tricky. Knowing practical tips helps improve your workflow and efficiency. Whether working on complex models or simple designs, these tips can simplify the process.
Efficiency Tips
- Use shortcuts to speed up your work. Learn hotkeys for common tasks.
- Organize your workspace. Keep tools you use often within reach.
- Use the grid and snap functions. They help align your seams perfectly.
- Optimize your settings. Adjust Blender preferences to suit your workflow.
- Limit unnecessary steps. Focus on the essential actions needed to make seams.
Enhancing Workflow
- Break tasks into smaller steps. Tackle each part methodically.
- Use layers to manage complex models. Separate parts for easier editing.
- Regularly save your work. Avoid losing progress due to unexpected issues.
- Test different techniques. Find what works best for your style.
- Seek feedback from peers. Collaboration often leads to better results.

Credit: www.reddit.com
Frequently Asked Questions
How To Make Seams In Blender?
In Blender, select your 3D model in Edit Mode. Choose edges for seams by holding Shift and right-clicking. Press Ctrl+E and select “Mark Seam” from the menu. The seams will help in unwrapping the model for texturing.
How To Merge Intersecting Objects In Blender?
To merge intersecting objects in Blender, select both objects, press ‘Ctrl + J’ to join them. Use ‘Boolean Modifier’ for precise intersection merging. Adjust settings for desired results. Apply modifier once satisfied. Ensure normals are correct for seamless merging.
How To Seamlessly Join Two Objects In Blender?
Select both objects in Blender. Press “Ctrl+J” to join them. Use “Edit Mode” to adjust vertices and edges for a seamless fit. Ensure smooth transitions with “Edge Merge” and “Vertex Snap. ” Check alignment and texture. Optimize mesh topology for better integration.
How To Create A Vertex Where Two Edges Intersect?
Use intersection tools in your software to create a vertex where two edges meet. Ensure edges intersect precisely. Adjust settings if needed for accuracy. Save changes to maintain your design integrity.
Conclusion
Creating perfect seams at intersections in Blender is achievable. Practice regularly to improve your skills. Remember, patience is key in 3D modeling. Follow each step carefully for better results. Experiment with different techniques to find what works best. Mistakes are part of the learning process.
Keep refining your methods as you gain experience. Soon, you’ll produce clean and precise intersections. Share your progress with fellow Blender users. Engage with the community for support and tips. Enjoy the process and keep creating. Your hard work will pay off in your projects.

Home Improvement Expert & Senior Writer at HomeFixio
Eliot Granger is a seasoned home improvement expert with years of experience transforming living spaces. Specializing in everything from kitchen renovations to bathroom upgrades, Eliot shares his knowledge through practical, insightful articles. His passion for creating functional, beautiful homes drives him to offer expert tips and solutions for every corner of your house. As a trusted writer for HomeFixio, Eliot is dedicated to helping homeowners make informed decisions and achieve precision in their projects.