How to Replace Water Filter on Kitchenaid Refrigerator?
Is your KitchenAid refrigerator’s water not tasting as fresh as it used to? It might be time to replace the water filter.
Changing your filter regularly keeps your water clean, fresh, and free from impurities. But don’t worry—replacing the water filter on your KitchenAid fridge is easier than you think. In this guide, you’ll find simple, step-by-step instructions that anyone can follow.
By the end, you’ll know exactly how to keep your water tasting great and your fridge running smoothly. Ready to get started? Let’s dive in!
Locate The Water Filter
Finding the water filter in your KitchenAid refrigerator is the first step to a fresh water supply. The filter location varies by model but is usually easy to access. Knowing where to look saves time and effort during replacement.
Most KitchenAid filters are designed for simple removal and replacement. Familiarity with common spots helps you avoid frustration. Some filters hide behind panels or inside compartments.
Common Filter Locations In Kitchenaid Models
- Inside the refrigerator compartment, near the top right corner
- In the grille at the bottom front of the fridge
- Behind a small door or panel inside the fridge’s upper interior
- Near the water dispenser area, inside the door or wall
Check your model’s manual if unsure. The filter is usually marked or has a handle for easy grip.
Tools Needed For Access
- Soft cloth to protect surfaces
- Flathead screwdriver to open panels if needed
- Gloves for a better grip and cleanliness
- Flashlight to see inside dark compartments
Most filters twist or snap out by hand. Tools help only if covers block access. Prepare these items before starting the replacement process.
Prepare For Replacement
Preparing for the water filter replacement on your KitchenAid refrigerator is vital for a smooth process. Proper preparation saves time and prevents issues during installation. Start by ensuring you have everything needed and understand the initial steps.
Turn Off Water Supply
Stop the water flow to avoid leaks during replacement. Locate the water valve behind or beneath the refrigerator. Turn the valve clockwise to close it firmly. Check if the water stops flowing by dispensing water briefly. This step protects your floor and appliance from water damage.
Gather Replacement Filter
Use the correct filter model for your KitchenAid refrigerator. Find the filter number in the user manual or on the old filter. Purchase a genuine replacement to ensure water quality and proper fit. Keep the new filter handy near the fridge before starting the swap. This readiness speeds up the replacement process.
Remove The Old Filter
Removing the old water filter from your KitchenAid refrigerator is a crucial step to ensure fresh, clean water and optimal appliance performance. It might seem simple, but understanding the correct techniques can save you from frustration or accidental damage. Let’s dive into how you can confidently take out that old filter.
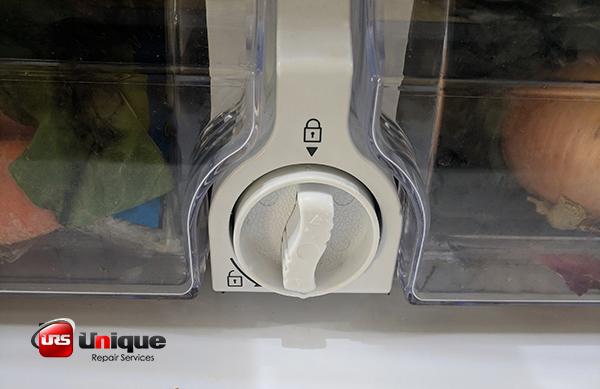
Release Mechanism Techniques
KitchenAid filters typically use either a push-in or twist-and-pull release mechanism. Look carefully at your filter housing—if it has arrows, they usually indicate the direction to turn the filter.
Try gently twisting the filter counterclockwise. If it doesn’t budge, check if there’s a release button nearby. Pressing this button while pulling the filter straight out can make removal much easier.
Did you know some models require you to slightly push the filter inward before twisting? This small step can make a big difference. If you feel stuck, don’t force it; instead, double-check the manual or online resources for your specific model.
Handling The Used Filter
Once the filter is out, handle it carefully to avoid water spills. Keep a towel handy because some water will drip from the filter or the housing.
Dispose of the used filter according to local recycling guidelines. Some filters can be recycled, which helps reduce waste. If you’re unsure, check the packaging or manufacturer’s website.
Have you ever noticed a strange taste or odor in your water after a filter change? That might be because the new filter wasn’t installed properly after removing the old one. So, make sure to follow the next steps closely to avoid this common problem.

Credit: www.searspartsdirect.com
Install The New Filter
Installing the new water filter in your KitchenAid refrigerator is a simple task that ensures clean, fresh water. This step focuses on placing the filter correctly and securing it firmly. Proper installation prevents leaks and maintains water quality.
Aligning The Filter Correctly
Start by matching the new filter with the filter slot. Look for the arrow or notch on the filter and the slot. These marks help align the filter perfectly.
Hold the filter so the arrow points toward the filter housing. Insert the filter straight into the slot without forcing it. Twisting gently can help the filter fit smoothly.
Securing The Filter In Place
After aligning the filter, turn it clockwise until it stops. You should hear a click or feel resistance. This means the filter is locked and sealed.
Check that the filter is snug and does not wobble. A loose filter may cause leaks or poor water flow. Wipe around the filter area to remove any dirt or water.
Flush The Water System
Flushing the water system after replacing the water filter in your KitchenAid refrigerator is crucial to ensure clean, fresh water. This process helps clear out any trapped air and loose debris that can affect water flow and taste. Skipping this step might leave you with cloudy water or weak water flow, which nobody wants.
Running Water To Clear Air And Debris
Once you install the new filter, run water through the dispenser continuously for about 3 to 5 minutes. This action flushes out air pockets and any tiny particles left from the filter’s manufacturing process.
You’ll notice sputtering or inconsistent flow at first—don’t worry, this is normal. Keep the water running until it flows steadily and looks clear. This simple step can save you from unpleasant surprises in taste and performance.
Checking For Leaks
After flushing, check around the filter housing and connections for any signs of leaks. Use a dry cloth to inspect the area carefully and wipe off any moisture you find.
Leaks often occur if the filter is not seated correctly or if the O-ring is damaged. If you spot any leakage, turn off the water supply and reseat or replace the filter to avoid water damage inside your fridge or kitchen.

Credit: www.searshomeservices.com
Reset The Filter Indicator
Resetting the filter indicator on your KitchenAid refrigerator is important after changing the water filter. This step helps the fridge track the new filter’s usage correctly. The indicator light will turn off, showing the filter is fresh and ready to use.
Using Control Panel
Locate the control panel on the front of your refrigerator. Find the filter reset button or the water filter indicator light. Press and hold this button for about 3 to 5 seconds. The light will blink or turn off, signaling the reset process. Some models may require pressing two buttons at the same time. Check your user manual if unsure.
Confirming Reset Success
After resetting, watch the filter indicator light closely. It should be off or show a green color. This means the filter status is updated. If the light stays on or blinks, repeat the reset process. Make sure the new filter is installed properly. Resetting confirms your fridge tracks filter life accurately for clean water.
Maintenance Tips
Keeping your KitchenAid refrigerator’s water filter in top shape is essential for clean, fresh-tasting water. Proper maintenance ensures that your filter works efficiently and protects your family from contaminants. Here are some key tips to help you know exactly when and how to replace your water filter.
When To Replace The Filter
Most KitchenAid water filters need replacement every six months. However, this can vary based on your water usage and quality. If you use your fridge heavily or your water has more impurities, changing the filter more often might be necessary.
Many models have a filter indicator light to remind you when it’s time to swap the filter. Don’t ignore this signal—it’s designed to protect your health and keep your water tasting great.
Signs Of Filter Issues
How do you know if your filter isn’t doing its job? Watch for these clear signs:
- Unpleasant taste or odor:If your water starts tasting strange or smells off, the filter may be clogged or expired.
- Slow water flow:A significant drop in water pressure often means the filter is blocked and needs replacement.
- Cloudy or discolored water:Visible particles or discoloration indicate the filter is no longer effectively cleaning your water.
Have you ever ignored these signs and regretted it later? Addressing filter problems quickly saves you from potential health risks and costly repairs. Your refrigerator’s filter is your first defense against contaminants—treat it accordingly.

Credit: www.kitchenaid.com
Frequently Asked Questions
How Often Should I Replace Kitchenaid Water Filter?
Replace the Kitchenaid water filter every 6 months for best performance. Frequent use or poor water quality may require earlier replacement.
How Do I Reset The Water Filter Indicator Light?
After replacing the filter, press and hold the reset button for 3 seconds. This resets the indicator light on most Kitchenaid models.
Can I Use Any Brand Filter For Kitchenaid Fridge?
It’s best to use Kitchenaid branded or certified filters. They ensure compatibility and maintain water quality standards.
What Are Signs My Kitchenaid Water Filter Needs Replacement?
Reduced water flow, strange taste, or odor indicate it’s time to replace the filter promptly.
Conclusion
Replacing the water filter on your KitchenAid refrigerator is simple and quick. Just follow the steps carefully to ensure clean, fresh water. Changing the filter regularly keeps your water tasting great and your fridge running well. Don’t wait for the water to taste odd or slow down.
A fresh filter protects your health and improves water quality. Keep track of when to change it next time. Easy maintenance helps your fridge last longer and work better every day.

Home Improvement Expert & Senior Writer at HomeFixio
Reed Atwood is a seasoned home improvement expert with a passion for transforming everyday living spaces into functional and stylish havens. With years of experience in DIY projects, renovations, and home upgrades, Reed brings a wealth of knowledge to HomeFixio. As a senior writer, he provides readers with practical, easy-to-follow guides, expert tips, and innovative solutions for every room in the house. His goal is to empower homeowners to tackle their projects with confidence, ensuring both quality results and a rewarding experience.