Where is the Water Filter on Whirlpool Refrigerator: Quick Guide
Are you wondering where the water filter is on your Whirlpool refrigerator? Finding it quickly can save you time and ensure your water stays fresh and clean.
Whether you’re replacing the filter or just curious, knowing exactly where to look makes the process simple and stress-free. Keep reading, and you’ll discover the easy steps to locate your Whirlpool refrigerator’s water filter—so you can enjoy pure, great-tasting water without any hassle.

Credit: www.youtube.com
Locating The Water Filter
Finding the water filter in a Whirlpool refrigerator is important for maintenance. The filter keeps your water clean and fresh. Different models place the filter in various spots. Knowing where to look saves time and effort.
Inside The Refrigerator Compartment
Many Whirlpool refrigerators have the water filter inside the main compartment. It often sits near the top or back wall. Look for a small, round or rectangular cover. Sometimes, it is near the light or control panel. This spot makes changing the filter simple and quick.
At The Base Or Back Of The Unit
Some models place the water filter at the base or back of the fridge. Check near the bottom grille or under the kick plate. The filter may be hidden behind a small panel. This design helps with easy access without opening the fridge door.
Near The Fresh Food Section
Filters may also be found near the fresh food section. This area is usually in the middle or lower part of the fridge. The filter is close to the water dispenser and ice maker parts. This position allows quick water flow and efficient filtration.
Types Of Whirlpool Water Filters
Whirlpool refrigerators come with different types of water filters designed to keep your drinking water and ice clean and fresh. Knowing the type of filter your model uses can make replacement easier and ensure you always have pure water on hand. Let’s look at the two main types of Whirlpool water filters you’ll encounter.
Push-in Filters
Push-in filters are straightforward to install and remove. You simply push the filter into its housing until it clicks into place. This design makes changing the filter quick and hassle-free, perfect if you want to avoid any complicated steps.
These filters often fit inside the refrigerator compartment or near the top grille. If you’ve ever replaced a filter by just pressing it in and pulling it out, you’ve probably dealt with a push-in type. They seal tightly to prevent leaks but remain easy to handle.
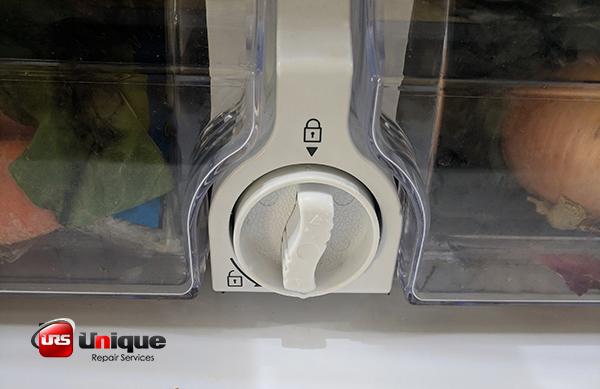
Twist-in Filters
Twist-in filters require you to twist the filter to lock or unlock it from its holder. This mechanism provides a secure fit, reducing the chance of water bypassing the filter. You might need a bit more effort to replace these filters, but the process remains user-friendly.
Typically located in the refrigerator’s upper right corner or inside the fresh food compartment, twist-in filters often come with clear markings to guide you. Have you noticed how a simple twist can make a big difference in securing your water filter? It’s a practical design choice to keep your water clean and your refrigerator leak-free.
Steps To Remove The Water Filter
Removing the water filter from your Whirlpool refrigerator might seem tricky at first, but it’s actually a straightforward task. Knowing exactly how to prepare, remove, and replace the filter will save you time and prevent any damage. Let’s walk through the essential steps to make this process smooth and hassle-free.
Prepare For Filter Removal
Start by locating the water filter inside your Whirlpool refrigerator. It’s usually in the upper right corner of the fridge compartment or at the base grille, depending on your model. Before touching the filter, turn off the water supply to avoid spills or leaks.
Having a towel or small container nearby helps catch any drips. If your refrigerator has a water dispenser, press the dispenser lever for a few seconds after turning off the water to release pressure. This simple prep prevents unexpected water sprays when you remove the filter.
Twisting Or Pulling Out The Filter
Most Whirlpool filters are designed to be removed by twisting or pulling. Check your model’s filter type—some twist counterclockwise, while others just pull straight out. Apply firm but gentle pressure; forcing the filter can cause damage.
If the filter feels stuck, don’t rush. Wiggle it slightly as you twist or pull, and it should come out smoothly. Remember, the goal is to avoid breaking any parts inside the filter housing.
Handling Filter Replacement
Once the old filter is out, compare it with your new one to ensure compatibility. Remove any protective caps or seals from the new filter before installation. Insert the new filter by pushing it in or twisting it clockwise until it locks into place.
After installation, turn the water supply back on and run water through the dispenser for a few minutes. This flushes out any air or loose carbon particles from the new filter. Have you noticed how fresh the water tastes after a proper filter change? It’s a small step that makes a big difference in your daily hydration.
Credit: www.youtube.com
Installing A New Filter
Installing a new water filter in your Whirlpool refrigerator is straightforward but requires careful attention to detail to ensure clean, fresh-tasting water. Taking the time to install the filter properly helps avoid leaks and maintains the efficiency of your appliance. Let’s look at the key steps to get your new filter in place correctly and ready to use.
Aligning The Filter Correctly
Start by locating the filter compartment—usually inside the fridge or at the base grille. Your new filter will have arrows or marks showing the correct orientation. Align these indicators with the slots or guides inside the compartment.
If the filter doesn’t fit easily, don’t force it. Check the alignment again. A properly aligned filter should slide in smoothly and sit flush without gaps.
Securing The Filter In Place
Once aligned, twist or push the filter gently until it locks into place. You’ll often hear a click or feel resistance indicating it’s secured. This step is crucial to prevent water leaks and ensure the filter functions as designed.
Double-check by giving the filter a slight tug—it should stay firmly in position. If it feels loose, remove and reinstall it, paying close attention to the locking mechanism.
Resetting The Filter Indicator
Your Whirlpool refrigerator likely has a filter indicator light that reminds you when to change the filter. After installing the new filter, you need to reset this light. This reset process varies by model but usually involves pressing and holding a button on the control panel for a few seconds.
Resetting the indicator helps you keep track of filter life and ensures you don’t miss the next replacement. Have you ever ignored this step and ended up with poor-tasting water? Resetting keeps your system reliable and your water fresh.
Signs To Replace The Water Filter
Knowing when to replace the water filter in your Whirlpool refrigerator is crucial for maintaining clean, fresh water and ice. Ignoring the signs can lead to poor water quality and reduced appliance performance. Keep an eye out for these clear indicators that it’s time for a new filter.
Decreased Water Flow
If you notice that water from your refrigerator’s dispenser is coming out slower than usual, it’s a strong sign the filter is clogged. A restricted filter makes it harder for water to pass through, which can frustrate you during busy moments in the kitchen.
Think about the last time you waited longer than expected just to fill a glass. That delay often points to a filter working beyond its capacity. Replacing the filter restores smooth water flow quickly.
Warning Indicator Lights
Most Whirlpool refrigerators have a built-in indicator light that tells you when it’s time to change the water filter. When this light turns on or starts blinking, it’s not a suggestion—it’s a clear alert from your fridge.
Ignoring this warning can affect water taste and quality, so don’t delay. Check your user manual to locate this feature and understand how it works on your specific model.
Taste And Odor Changes
Have you ever taken a sip of water from your fridge and noticed a strange taste or smell? This is one of the most obvious signs your water filter is no longer effective.
Filters trap contaminants and improve flavor, but when they get old, they can’t keep up. If your water tastes metallic, sour, or just off, it’s time to replace the filter for better hydration and peace of mind.

Credit: www.searshomeservices.com
Troubleshooting Common Issues
Dealing with water filter issues in your Whirlpool refrigerator can be frustrating, but many problems have simple fixes. Understanding where the filter is and how it works can save you time and hassle. Let’s look at some common problems you might face and how to troubleshoot them effectively.
Filter Leaks
If you notice water pooling around the filter area, a leak might be the cause. Check if the filter is installed correctly—sometimes it’s not pushed in all the way or twisted too tightly.
Inspect the O-ring on the filter for cracks or damage. A worn-out O-ring can cause leaks and needs to be replaced. Also, make sure you’re using the correct filter model for your refrigerator; incompatible filters often don’t seal properly.
Water Dispenser Not Working
Your water dispenser might stop working if the filter is clogged or improperly installed. Try removing and reinstalling the filter to ensure a tight fit. If the problem persists, the water line could be frozen or blocked, especially in cold weather.
Another reason could be low water pressure from your home’s supply. Have you checked if the water valve behind the fridge is fully open? That small detail often gets overlooked.
Filter Indicator Not Resetting
The filter indicator light helps remind you when to change the filter, but sometimes it doesn’t reset after replacement. You usually need to press and hold a specific button, like “Reset” or “Filter,” on your control panel for a few seconds.
If that doesn’t work, consult your user manual for the exact reset procedure. Ignoring the indicator can lead to reduced water quality, so it’s worth spending a minute to reset it properly.
Frequently Asked Questions
Where Is The Water Filter Located In A Whirlpool Refrigerator?
The water filter is usually inside the refrigerator compartment. Look at the upper right corner or behind the crisper drawers. Some models have it at the base grille. Check your user manual for exact location.
How Do I Replace The Whirlpool Refrigerator Water Filter?
Turn off the water supply first. Twist the old filter counterclockwise to remove it. Insert the new filter and twist it clockwise until secure. Flush water for a few minutes to clear air and impurities.
How Often Should I Change The Whirlpool Water Filter?
Replace the water filter every six months or after filtering 300 gallons. Frequent use or poor water quality may require earlier replacement. Regular changes ensure clean, fresh-tasting water and prevent clogging.
What Are Signs The Whirlpool Water Filter Needs Replacement?
Slow water flow, bad taste, or odor indicate filter replacement. Also, ice maker issues or cloudy ice cubes can signal a clogged filter. Changing the filter restores water quality and appliance performance.
Conclusion
Finding the water filter on your Whirlpool refrigerator is easier than you think. It is usually inside the fridge, near the top or bottom corner. Changing the filter regularly keeps your water fresh and clean. Clean filters help your fridge work better and last longer.
Keep track of the filter’s location to replace it on time. This simple step improves your drinking water quality every day. Now you know where to find the filter and why it matters.

Home Improvement Expert & Senior Writer at HomeFixio
Reed Atwood is a seasoned home improvement expert with a passion for transforming everyday living spaces into functional and stylish havens. With years of experience in DIY projects, renovations, and home upgrades, Reed brings a wealth of knowledge to HomeFixio. As a senior writer, he provides readers with practical, easy-to-follow guides, expert tips, and innovative solutions for every room in the house. His goal is to empower homeowners to tackle their projects with confidence, ensuring both quality results and a rewarding experience.