How to Rewire a Table Lamp: Step-by-Step Guide
Imagine the moment when your favorite table lamp suddenly stops working. The cozy corner of your living room feels incomplete, and you’re left in the dark.
But don’t worry—rewiring a table lamp is easier than you might think. With a little guidance, you can restore its charm and functionality. This task isn’t just about fixing a lamp; it’s about empowering yourself to solve problems and breathe new life into your surroundings.
You’ll discover a simple yet rewarding project that can save you money and give you the satisfaction of doing it yourself. Dive in to learn how you can effortlessly bring back the glow to your space.
Tools And Materials
Rewiring a table lamp can seem daunting. But with the right tools, it’s manageable. Knowing what you need is the first step. Having the right materials ensures safety and efficiency.
Basic Tools
You need a few basic tools. A screwdriver is essential. Use it to open the lamp base. Wire strippers are also important. They help remove insulation from wires. Pliers are needed too. They grip and twist wires securely.
Electrical Supplies
Get a replacement lamp cord. Ensure it is the correct length. A new plug is also necessary. It connects the lamp to the power source. Lamp sockets are vital. They hold the bulb and connect to the cord.
Safety Equipment
Safety should never be overlooked. Wear gloves to protect your hands. Safety glasses guard your eyes. They shield against small debris. Always have a voltage tester. It checks if wires are live.
Safety Precautions
Ensure safety by unplugging the lamp before starting the rewiring process. Use insulated tools to avoid electrical shocks. Double-check connections to prevent any potential hazards.
Rewiring a table lamp can be a rewarding project. However, it requires careful attention to safety. Ignoring safety precautions can lead to electrical hazards or even fire risks. Before you jump into the task, familiarize yourself with some essential safety measures. By taking these precautions, you ensure not only the success of your project but also your well-being.Unplug The Lamp
Always start by unplugging the lamp from the wall socket. This is a crucial step that many people overlook in their eagerness to begin. Even if the lamp is turned off, it can still be dangerous if it remains connected to power. By unplugging it, you eliminate any chance of electrical shock.Inspect The Cord And Plug
Check the lamp’s cord and plug for any signs of damage or wear. Frayed wires or a cracked plug could be hazardous. If you notice any damage, replace the cord and plug before proceeding. This proactive step can prevent unexpected accidents.Use Proper Tools
Ensure you have the right tools for the job. A screwdriver, wire cutters, and a voltage tester are essential. Using the wrong tools can lead to mistakes or injuries. Investing in a basic electrical toolkit can make the task easier and safer.Work In A Well-lit Area
Choose a well-lit, clutter-free workspace. Good lighting helps you see what you’re doing and reduces the risk of errors. It’s easy to miss important details if you’re working in dim light. A clear space also minimizes distractions and accidents.Wear Protective Gear
Consider wearing protective gloves and goggles. Gloves can protect you from sharp wires, while goggles guard against any unexpected sparks. These small precautions can make a big difference in your safety.Double-check Connections
Before reassembling the lamp, double-check all your electrical connections. Ensure that wires are securely fastened and not exposed. A loose wire can cause short circuits or electrical fires. Taking a moment to review your work can save you from potential hazards.Test With A Voltage Tester
Before plugging the lamp back in, use a voltage tester to ensure there are no live wires. This step verifies that your wiring is correct and safe. It’s a simple yet effective way to confirm your work. Wouldn’t you rather be safe than sorry? Implementing these safety measures can make a significant difference in your DIY experience. Have you considered what could go wrong if you skipped these steps? Prioritizing safety doesn’t just protect you—it ensures the longevity of your lamp and the success of your project.Removing The Old Wiring
Start by safely removing the old wiring from the table lamp. Ensure the lamp is unplugged first. Carefully detach wires from the socket and base. Keep track of all components for easy reassembly. This step prepares the lamp for new wiring, ensuring safety and functionality.
Rewiring a table lamp can breathe new life into your space. Removing the old wiring is the first step in this process. It requires patience and attention to detail. This task ensures your lamp functions safely and efficiently. Follow these simple steps to disconnect the old wiring and prepare for the new.Unplug The Lamp
Safety is crucial. Ensure your lamp is unplugged from the power outlet. This prevents any risk of electrical shock. Double-check to make sure the lamp is off. Place the plug in a safe spot.Disassemble The Lamp
Begin by removing the lamp shade. Next, unscrew the components carefully. Keep all parts organized as you disassemble. This helps during reassembly. Use a screwdriver to loosen any screws. Some lamps might have clips. Gently remove them.Detach The Old Cord
Locate the old cord inside the lamp base. It might be held by a knot or clamp. Carefully untangle or unscrew these. Pull the cord through the base. Be gentle to avoid damage. Dispose of the old cord responsibly. These steps prepare your lamp for new wiring. Follow them to ensure a smooth rewiring process.
Credit: copper.org
Preparing The New Wiring
Rewiring a table lamp can seem daunting. But it becomes easier with preparation. This step ensures safety and functionality. Start by gathering your materials. Then follow each step carefully. The new wiring process involves choosing and cutting the right cord.
Choose The Right Cord
Selecting the right cord is crucial. Ensure the cord matches your lamp’s needs. Check the cord’s thickness and length. Thicker cords handle more power. Choose a cord that fits your lamp’s style. This adds to the lamp’s overall look. Safety should always be your top priority.
Measure And Cut The Cord
Accurate measurements are key. Use a measuring tape for precision. Measure the distance from the socket to the plug. Add extra length for flexibility. Once measured, cut the cord carefully. Use wire cutters for a clean cut. Double-check the length before proceeding. Proper measurement ensures a smooth rewiring process.
Installing The New Wiring
Rewiring a table lamp is a rewarding DIY project that can breathe new life into your favorite piece of decor. Whether you’re fixing a vintage find or updating an old lamp, installing new wiring is a crucial step. It might seem daunting at first, but with some patience and the right guidance, you can successfully complete this task. Here’s how you can install the new wiring in your table lamp, ensuring it’s safe and functional.
Thread The Cord Through The Base
First, make sure your lamp is unplugged and the old wiring is removed. Grab the new cord and thread it through the base of the lamp. This might require some maneuvering, especially if the base is narrow or has curves. If you’re struggling, try using a piece of wire or a straightened coat hanger to guide the cord through.
Once the cord is through, pull it gently to ensure it’s securely positioned. It’s essential that the cord isn’t twisted or kinked, as this could affect its performance. You might be surprised at how straightforward this step can be. Just take your time and don’t rush it.
Connect The Wires To The Socket
Now comes the moment where you connect the wires to the socket. You’ll notice that the socket has two screws – one for each wire. Attach one wire to each screw, ensuring that the wire wraps around the screw in a clockwise direction. This ensures a secure connection.
It’s a simple process, but precision is key. Double-check that the wires are tightly secured and there’s no loose connection. Ask yourself: did you align the wires properly? If you’re unsure, revisit the connection before proceeding.
After connecting the wires, reassemble the socket and test the lamp. Plug it in and switch it on. If it lights up, congratulations – you’ve successfully rewired your lamp! If not, revisit the connections and check for any issues. Remember, persistence is your friend.
Reassembling The Lamp
Rewiring a table lamp involves disconnecting the old wires and attaching new ones. Ensure the lamp is unplugged before starting. Follow step-by-step instructions for a safe and successful rewiring process.
Reassembling your table lamp can be a rewarding experience, especially after you’ve successfully replaced the wiring. This step not only ensures that your lamp functions safely but also gives you a sense of accomplishment. Let’s walk through how to put everything back together seamlessly.Secure The Socket
Start by securing the socket, which is the heart of your lamp. Place the new socket in its position and ensure it’s tightly connected to the base. You might notice that it clicks into place, giving you a reassuring signal that it’s secure. Check that the wires are properly attached to the socket’s terminals. A loose connection here could mean flickering lights or no light at all. Make sure the screws are fastened securely, but be careful not to overtighten and damage the components.Reattach The Lamp Parts
Once the socket is in place, it’s time to reattach the lamp parts. Begin by sliding the neck and body pieces back into their original positions. It’s a bit like solving a puzzle; each piece has its unique place. Remember the order in which you disassembled them. If you took a photo before starting, now’s the time to refer back to it. This ensures that everything fits perfectly and the lamp stands straight. Finally, attach the lampshade. Make sure it’s stable and not wobbly. A sturdy lampshade not only looks good but also adds to the overall safety of your lamp. Now, take a step back—how does it feel to see your lamp back together, ready to light up your space again? Engaging with a DIY project like this can be a fun way to learn and grow. Are there other household items you might want to tackle next?Testing The Lamp
Testing the lamp ensures safety and functionality after rewiring a table lamp. Switch the lamp on and check for light. If it works, the rewiring is successful. If not, check connections and try again.
After successfully rewiring your table lamp, the excitement of seeing it light up can be quite rewarding. Testing the lamp is the final, crucial step to ensure all your hard work pays off. This is your moment to confirm that every connection is secure and your lamp is ready to shine brightly once more. It’s also a chance to troubleshoot any issues that may arise, ensuring a safe and functional fixture for your space.Plug In The Lamp
First, find a nearby outlet and plug in your newly rewired lamp. This step might seem straightforward, but it’s the bridge between your rewiring efforts and the lamp’s functionality. Stand back slightly as you plug it in. This adds a layer of safety in case of unexpected sparks or shorts. Does the plug fit snugly? If it feels loose, consider checking the prongs for damage or misalignment.Check For Proper Function
Once plugged in, switch on the lamp. Does it light up immediately, or is there a delay? A delay might indicate a loose connection or a faulty switch. Look at the bulb. Is it flickering or steady? Flickering can be a sign of a loose bulb or socket connection. Feel the lamp’s cord and base. Are they warm to the touch? This could indicate a wiring issue that needs attention. If everything seems in order, congratulations! Your rewired lamp is good to go. If not, revisit your connections. Sometimes, a second look can reveal overlooked issues. Have you ever rewired a lamp and found unexpected results during testing? Share your experiences and learnings. It’s these stories that enrich our DIY endeavors and help others in their own projects.
Credit: www.youtube.com
Troubleshooting Common Issues
Troubleshooting common issues while rewiring a table lamp can be a real challenge. You might find yourself scratching your head over why your lamp won’t turn on or why the socket seems incompatible. Let’s tackle these common problems together. With practical insights and a bit of patience, you can get your lamp shining bright.
Socket Doesn’t Fit
Have you ever faced the frustration of a socket that just won’t fit? It’s a common issue, especially when dealing with older lamps or mismatched parts. Check the size of the socket compared to the base of the lamp. Sometimes, older lamps have unique socket sizes that require specific fittings.
Consider measuring the socket and comparing it to the base of the lamp. You may need a new socket or adapter. A quick trip to the hardware store can solve this. Make sure to bring your lamp or the socket, so you can get the perfect match. Have you ever wondered why sockets vary so much? It’s often due to different manufacturing standards over the years.
Lamp Doesn’t Turn On
It’s disappointing when you’ve rewired a lamp only for it not to light up. Start by checking the bulb. Is it properly screwed in? A loose bulb can be an easy fix. If the bulb is secure, inspect the wiring connections. Sometimes, wires can be loose or not properly connected.
Test the lamp with a different bulb. It might be as simple as a burnt-out bulb causing the issue. If the lamp still doesn’t turn on, examine the plug and cord. A frayed cord or damaged plug could be the culprit. Consider your last experience with a faulty plug; did replacing it solve the issue?
Troubleshooting these common issues can save you time and frustration. What other challenges have you faced while rewiring a lamp? Share your experiences below and let’s learn from each other.
Maintenance Tips
Rewiring a table lamp can enhance safety and functionality. Begin by unplugging the lamp and gathering necessary tools like wire cutters and a screwdriver. Carefully remove the old wiring, following manufacturer instructions, and replace it with new wires. Ensure connections are secure to prevent electrical hazards.
Maintaining your newly rewired table lamp ensures it remains safe and functional. It’s not just about rewiring; keeping your lamp in top condition requires ongoing attention. Whether you’re a DIY enthusiast or just someone who loves their cozy reading nook, regular upkeep can extend the life of your lamp and keep your space well-lit.Inspect The Wiring Regularly
Regularly check the wiring for any signs of wear or damage. Look for frayed wires or loose connections. If you spot anything suspicious, it might be time to replace those parts. Even if you feel confident in your wiring skills, don’t underestimate the importance of periodic inspections.Clean The Lamp Safely
Dust and dirt can accumulate over time, affecting the lamp’s performance. Use a soft cloth to wipe down the lamp base and shade. Avoid using water near the wiring. Keeping your lamp clean ensures that it shines brightly without any hindrance.Check The Bulb Wattage
Ensure you’re using the correct bulb wattage for your lamp. Using a bulb that’s too powerful can cause overheating. It’s worth checking the manufacturer’s guidelines. This small detail can prevent potential hazards and prolong your lamp’s life.Secure Loose Parts
Loose components can affect how your lamp functions. Tighten any loose screws or fittings. This simple action can prevent wobbling and make your lamp safer. Imagine reading your favorite book under a stable and steady light.Keep Away From Moisture
Moisture can be harmful to electrical components. Keep your lamp away from damp areas. If you live in a humid environment, consider using a dehumidifier. Protecting your lamp from moisture can prevent electrical shorts and ensure longevity.Replace Parts Promptly
If any part of your lamp seems worn out, replace it promptly. Whether it’s a switch or a socket, timely replacement can prevent larger issues. How often have you postponed minor fixes only to face bigger problems later?Ask For Help When Needed
If you’re unsure about any aspect of your lamp’s maintenance, don’t hesitate to ask for help. A professional can offer advice and ensure your lamp remains in top condition. Remember, it’s perfectly okay to seek expert guidance. Maintaining your table lamp can be straightforward and rewarding. What steps do you take to keep your favorite lamp shining bright?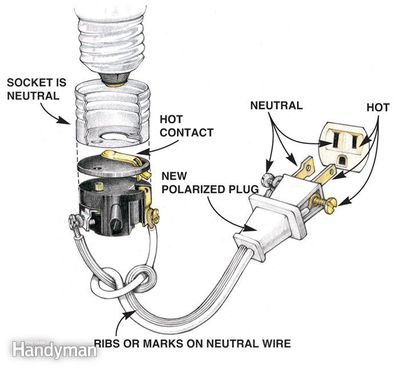
Credit: diylightingsupplies.com
Frequently Asked Questions
How To Safely Unplug A Table Lamp?
Before unplugging, ensure the lamp is switched off. Carefully grip the plug, not the cord, and pull it out. This prevents damage to the cord and electric shock. Always handle electrical items with dry hands. This simple step ensures safety and longevity for your lamp.
What Tools Are Needed To Rewire A Lamp?
To rewire a lamp, you’ll need a screwdriver, wire cutter, wire stripper, and a new lamp cord. These tools help safely remove old wiring and replace it. Having the right tools ensures a smooth rewiring process and proper lamp functioning.
Can I Use Any Wire For Lamp Rewiring?
No, you should use a lamp-specific wire, usually 18-gauge, for rewiring. This wire is designed for electrical safety and compatibility with household lamps. Using the correct wire prevents potential electrical hazards and ensures the lamp operates efficiently and safely.
How Do I Identify Lamp Wiring Issues?
Check for frayed wires, flickering, or inconsistent lighting. These are common indicators of wiring issues. If you notice any of these signs, consider rewiring the lamp. Addressing these problems promptly ensures safety and extends the lamp’s lifespan.
Conclusion
Rewiring a table lamp can seem tricky at first. But it’s manageable with the right steps. Gather your tools and materials before starting. Safety is key, so unplug the lamp. Follow the process step-by-step. Identify the wires and connect them properly.
Double-check your work. Test the lamp to ensure it functions well. Remember, practice makes perfect. Doing it yourself saves money. Plus, it boosts confidence in handling home repairs. Now, you’re ready to tackle more DIY projects. Happy rewiring!

Home Improvement Specialist & Writer at HomeFixio
Caden Rutherford is a seasoned home improvement specialist with extensive hands-on experience in residential construction, renovations, and design. With a keen eye for detail and a passion for transforming spaces, Caden shares practical advice and expert solutions to enhance the functionality and beauty of homes. As a writer for HomeFixio, Caden combines technical knowledge with creative flair, providing readers with informative guides on everything from structural improvements to aesthetic upgrades, empowering homeowners to achieve their ideal living spaces.