How to Install a Bathroom Vanity Light: Step-by-Step Guide
Ready to upgrade your bathroom with a touch of elegance and improved functionality? Installing a bathroom vanity light is a simple yet transformative project that can illuminate your space beautifully.
Imagine stepping into your bathroom each morning, greeted by perfect lighting that enhances your mood and makes your daily routine a breeze. Whether you’re a DIY enthusiast or just looking to save some money, learning how to install a bathroom vanity light yourself is easier than you think.
In this guide, you’ll discover straightforward steps to get the job done quickly and safely. By the end, you’ll have the confidence to tackle this task and enjoy the delightful glow of your new bathroom vanity light. Let’s brighten up your bathroom together!
Credit: www.hunterfan.com
Choosing The Right Vanity Light
Choosing the right bathroom vanity light can transform your space. It’s not just about illumination; it’s about style, efficiency, and functionality. Whether you’re updating your bathroom or setting up a new one, the right vanity light will enhance your daily routine and elevate your bathroom’s aesthetic. But how do you decide which light is perfect for your space? Let’s dive into some key aspects to consider.
Types Of Vanity Lights
Vanity lights come in various styles. You might choose a sleek, modern fixture that blends seamlessly with minimalist decor. Or perhaps a vintage-inspired sconce that adds character to your traditional bathroom. Wall-mounted lights are popular for their space-saving design. If your mirror is large, consider a bar light that runs horizontally across the top. Each type has its unique charm, so think about how it complements your bathroom’s overall vibe.
Considerations For Size And Style
Size matters when selecting your vanity light. Ensure the fixture is proportionate to your mirror and sink area. A small light over a large mirror might look sparse, while an oversized fixture can overwhelm a petite vanity. Style is equally crucial. Do you prefer a bold statement or a subtle accent? Match the light’s finish with other hardware in the bathroom for a cohesive look. Remember, your choice should reflect your personal taste.
Energy Efficiency Options
Energy efficiency is a smart choice for both the planet and your wallet. LED lights are an excellent option, offering durability and reduced energy consumption. They come in various brightness levels and colors to suit your needs. Consider dimmable options for versatility—bright for morning routines, softer for evening relaxation. An energy-efficient light doesn’t just save money; it contributes to a sustainable lifestyle. Are you ready to make the eco-friendly choice?
Choosing the right vanity light involves balancing aesthetics with practicality. Reflect on your style preferences and lifestyle needs to make an informed decision. Your bathroom is a personal sanctuary, and the perfect light fixture will enhance its beauty and functionality.
Credit: www.hunterfan.com
Gathering Tools And Materials
Before diving into the installation of your bathroom vanity light, gathering the right tools and materials is crucial. Just imagine you’re halfway through the project, only to realize you’re missing a vital tool. It’s frustrating, right? Preparing ahead ensures a smooth installation process, saving you time and possibly preventing mishaps. Let’s walk through the essential items you need to have on hand.
Essential Tools
Installing a bathroom vanity light doesn’t require a toolbox full of specialized tools, but there are a few key items you’ll need. A screwdriver is your best friend in this project. Whether flathead or Phillips, make sure you have both types ready. A drill can speed up the process, especially if you’re dealing with hard surfaces. A voltage tester is crucial to ensure electrical safety. It helps confirm that the power is off before you start working.
Safety Gear
Your safety is paramount, so don’t overlook this section. Wearing safety goggles protects your eyes from debris or accidental sparks. Gloves are another safety must-have, offering protection against sharp objects and electrical hazards. Don’t forget to wear a dust mask if you’re drilling into drywall to prevent inhaling dust particles. Are you prepared to keep safety first?
Required Materials
Materials are the backbone of your installation project. You need the vanity light fixture, of course. Ensure it complements the style of your bathroom. You’ll also need mounting hardware, which usually comes with the fixture. Double-check that you have the right screws and anchors for your wall type. Wire connectors are essential for joining electrical wires safely. Do you have everything in place for a flawless installation?
Being organized can make all the difference in your DIY projects. Have you ever started a project only to realize you forgot a tool or material? Share your experiences in the comments below!
Preparing The Installation Area
Installing a bathroom vanity light transforms the space with better illumination. Before starting, prepare the area carefully. This ensures a safe and smooth installation. Proper preparation avoids common mistakes and potential hazards. Let’s dive into the steps.
Turning Off Power
First, switch off the electricity at the breaker box. This prevents any electrical shocks while working. Double-check by trying to turn on the existing light. Make sure the power is off for safety.
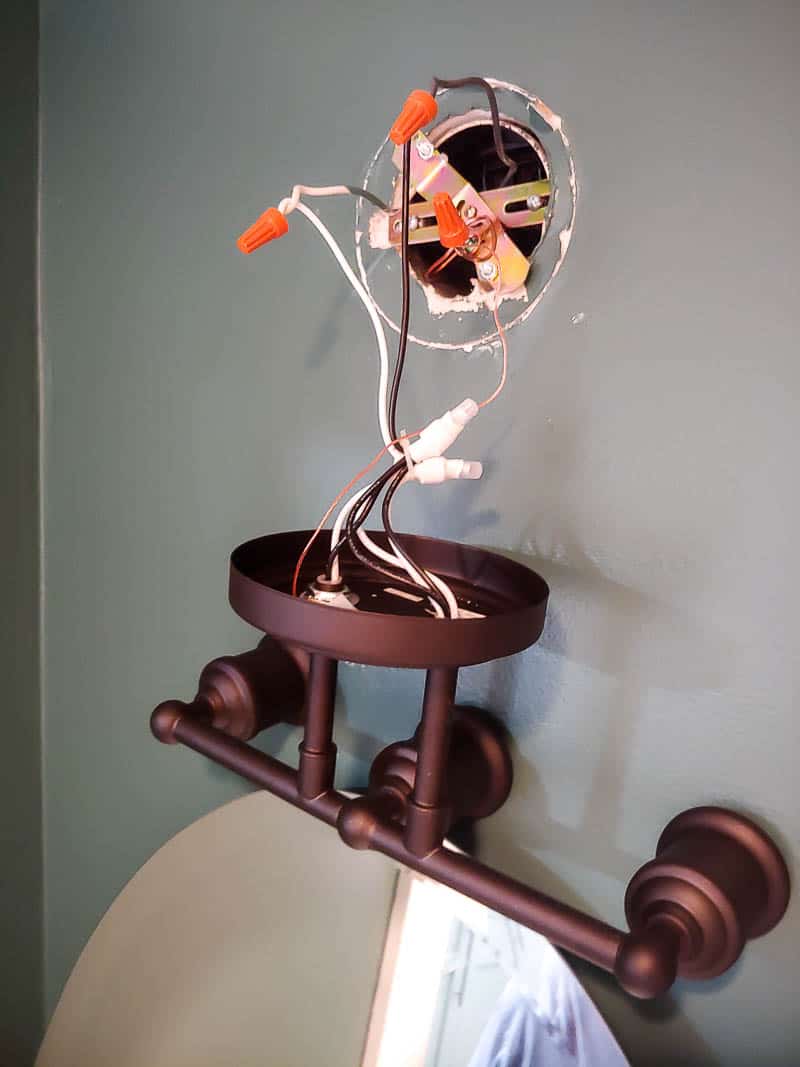
Removing Old Fixtures
Next, remove the old light fixture carefully. Start by unscrewing the light cover or shade. Then, unscrew the fixture from the wall. Gently disconnect the wires by loosening the wire nuts. Keep the area clean and organized for the new fixture.
Inspecting The Wall Surface
Inspect the wall surface for any damage or wear. Look for cracks, holes, or damp spots. Repair any issues to ensure a stable installation. A clean, dry surface provides the best support for your new vanity light.

Credit: www.youtube.com
Installing The Mounting Bracket
Installing the mounting bracket for your bathroom vanity light is a crucial step that sets the stage for the entire installation. It might seem simple, but getting it right can make a world of difference in ensuring your light fixture hangs securely and looks stunning. Have you ever installed something and later found out it’s slightly off-center or not as stable as you thought? With the right approach, you can avoid these pitfalls and have your vanity light shining brightly without worry.
Positioning The Bracket
Before you start, decide exactly where you want your vanity light to be. Measure the height from the floor or sink to ensure it’s at eye level. This makes a huge difference in how the light disperses across the room.
Consider how the light will interact with your mirror. Is it too high, too low, or perfectly aligned? Take a moment to visualize the final look. If you have someone to help, ask for their opinion on the placement. It’s always helpful to have a second set of eyes.
Once you’re satisfied with the position, mark the spot lightly with a pencil. This will be your guide when securing the bracket.
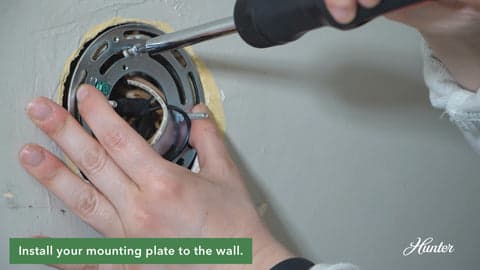
Securing The Bracket
Now, it’s time to secure the bracket. Use a drill to make holes where you’ve marked. Make sure the drill bit is slightly smaller than your screws to ensure a snug fit.
Are the holes in a stud or drywall? If it’s drywall, you might need wall anchors to provide extra support. This ensures the bracket—and your light—stays firmly in place.
Finally, screw the bracket into place using the appropriate screws. Tighten them securely, but be cautious not to overtighten as it might damage the wall. Once secured, give it a gentle shake to test its sturdiness.
Have you ever installed something, only to have it wobble later? Double-checking the stability now saves a lot of hassle down the road.
Connecting Electrical Wires
Connecting electrical wires is a crucial step in installing a bathroom vanity light. It’s where you bring light to your space, quite literally. This part might seem daunting if you’re not familiar with electrical work, but with the right guidance, you can handle it safely and effectively. The key lies in understanding wire colors, connecting them properly, and ensuring secure connections. Let’s dive into the details.
Identifying Wire Colors
When you open the electrical box, you may feel like you’re staring at a rainbow of wires. Each color has a purpose. Typically, you’ll encounter black, white, and green wires. Black is the hot wire, carrying electricity to the light.
White is neutral, helping complete the circuit. Green or bare copper is the ground wire, safeguarding you against electrical shocks. It’s like learning a new language, where each color speaks safety and functionality.
Connecting Wires Safely
Before you start connecting wires, ensure the power is off. This isn’t just a suggestion—it’s a rule. Use a voltage tester to confirm there’s no electricity flowing. Safety comes first, always.
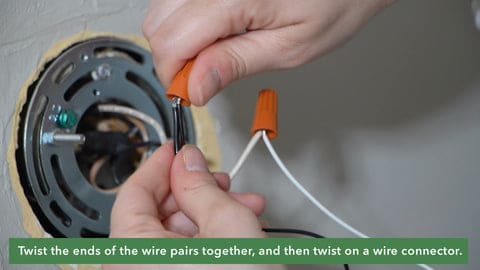
Once you’re sure, connect the wires by matching colors. Black to black, white to white, and green to green. It’s a simple color matching game, but the stakes are high. Make sure the connections are tight and secure.
Securing Wire Connections
Securing the connections is like putting a lid on a pot—you don’t want anything spilling out. Use wire nuts to cap the ends of the joined wires. Twist them on firmly to prevent any loose ends.
Check your work by gently tugging on each wire. If they hold, you’ve done it right. If they slip, re-secure them. Imagine having a loose wire; it could lead to flickering lights or worse, electrical hazards. You want a bright and safe bathroom, not an unpredictable light show.
Have you ever thought about how a simple vanity light can transform your bathroom space? With these steps, you’re not just installing a light; you’re creating a safer, well-lit environment. The details matter, and now you’re equipped to handle them confidently.
Attaching The Vanity Light
Attaching the vanity light in your bathroom can seem like a daunting task at first. But with the right guidance, it becomes an easy and rewarding DIY project. Once you’ve chosen the perfect light fixture to complement your bathroom’s design, it’s time to get it up on the wall. Let’s walk through the steps to ensure your vanity light is securely and correctly installed.
Positioning The Light Fixture
First, determine the optimal height for your vanity light. A common height is around 75 to 80 inches from the floor. This height ensures even lighting across your mirror, avoiding shadows on your face.
Consider the size of your mirror and the light fixture. The fixture should be centered above the mirror, or if you have side sconces, they should be at eye level. Double-check measurements with a tape measure for precision.
Mark the positions where the fixture will be attached. Use a pencil for easy adjustments. Ensure that these marks align with the electrical box and match the fixture’s attachment points.
Securing The Fixture
Now that you’ve positioned your light, it’s time to secure it. Turn off the power to your bathroom at the circuit breaker. Safety first—electricity is not something to take lightly.
With the power off, attach the mounting bracket to the electrical box. This bracket will support the fixture. Use screws from the fixture kit to ensure a snug fit.
Connect the wires from the fixture to the wires in the electrical box. Typically, black to black, white to white, and green or copper to the ground wire. Use wire connectors to secure these connections.
Finally, attach the fixture to the mounting bracket. Follow the instructions provided with your fixture for the best results. Tighten screws to keep everything in place firmly, but be careful not to over-tighten.
Ask yourself, how does the light look once attached? Does it align with your initial vision? If yes, admire your handiwork and flip the circuit breaker back on to test your new vanity light!
Attaching a vanity light not only enhances the aesthetic appeal of your bathroom but also improves its functionality. With your light securely in place, you’ve taken a significant step in your bathroom transformation journey. Enjoy the glow!
Testing And Adjustments
Installing a bathroom vanity light requires testing the connections and making necessary adjustments. Ensure the light fixture is securely mounted and aligned correctly. Check the electrical connections for any loose wires or faults.
Testing and adjustments are essential steps in installing a bathroom vanity light. After securing the fixture, ensure it functions correctly. A few simple checks can prevent future issues. This part of the process is quick and straightforward.Restoring Power
Turn the circuit breaker back on. This restores electricity to the bathroom. Ensure all connections are secure before doing this. Safety is a top priority. Use caution when handling electrical components.Checking Light Functionality
Switch on the light to test its operation. Confirm that the light illuminates properly. Observe for flickering or dimming issues. This indicates a problem with the connection. Ensure all bulbs are tightened securely.Making Necessary Adjustments
Check the fixture’s alignment. Ensure it hangs straight and evenly. Adjust the mounting screws if needed. Tighten loose parts to prevent wobbling. Reposition the light for optimal brightness. Aim for even illumination across the vanity area.Finishing Touches
You’ve installed your bathroom vanity light. Now it’s time for the finishing touches. They ensure your installation looks professional and aesthetically pleasing. These steps also help maintain a clean and organized space.
Cleaning Up Installation Area
Begin by removing any debris from the installation area. Gather tools and materials used. Store them in their designated places. Check for any screws or small parts left behind. Sweep or vacuum the area. Remove dust and particles that settled during installation.
Wipe down the vanity light with a damp cloth. Use gentle strokes to avoid scratching surfaces. Clean the bulb and fixture. This ensures maximum brightness and efficiency. A clean light enhances the overall look of your bathroom.
Enhancing Aesthetic Appeal
Consider adding decorative elements around the vanity light. Mirrors with unique frames can complement the fixture. Choose colors that match or contrast with the light. A harmonious setup creates visual interest.
Position plants or artwork nearby. These additions soften the space and add life. Select pieces that resonate with your personal style. Ensure they don’t overshadow the vanity light. Balance is key to achieving an elegant look.
Adjust the bulb’s brightness. Find a setting that suits your needs. Soft lighting can create a relaxing ambiance. Brighter settings are ideal for grooming tasks. Tailor the lighting to enhance the bathroom’s atmosphere.
Frequently Asked Questions
How Do I Choose The Right Bathroom Vanity Light?
Selecting the right light involves considering size, style, and brightness. Ensure it complements your bathroom decor. Measure your vanity to choose a fixture that fits proportionally. Opt for a style that matches your bathroom’s theme. Consider the light’s brightness to ensure it provides adequate illumination.
What Tools Are Needed To Install A Vanity Light?
You’ll need basic tools like a screwdriver, wire stripper, and voltage tester. A ladder may be necessary for reaching higher spots. Having a drill, electrical tape, and a level can be helpful. Ensure you have the new vanity light and any included mounting hardware before starting.
Is It Safe To Install A Light By Myself?
Yes, if you follow safety precautions and have basic electrical knowledge. Turn off the power at the circuit breaker before starting. Ensure you read the manufacturer’s instructions carefully. If unsure, consult a professional electrician to avoid potential hazards and ensure a safe installation.
Can I Replace An Old Fixture Easily?
Yes, replacing an old fixture can be straightforward with proper preparation. Start by turning off the power supply. Remove the old fixture carefully. Follow the installation instructions for the new light. Ensure the wires are connected properly and the fixture is securely mounted for safety.
Conclusion
Installing a bathroom vanity light is straightforward. Follow each step carefully. Safety is important, so turn off power first. Gather all needed tools before starting. Measure and mark your spot accurately. Secure the light fixture tightly. Check if it works correctly after installation.
Proper lighting enhances bathroom beauty and functionality. It brightens your space and adds style. Practice patience and attention to detail. Your bathroom will look and feel refreshed. Enjoy your new lighting setup! Ready to tackle more home projects? With this guide, you can confidently install a vanity light.

Home Improvement Specialist & Writer at HomeFixio
Caden Rutherford is a seasoned home improvement specialist with extensive hands-on experience in residential construction, renovations, and design. With a keen eye for detail and a passion for transforming spaces, Caden shares practical advice and expert solutions to enhance the functionality and beauty of homes. As a writer for HomeFixio, Caden combines technical knowledge with creative flair, providing readers with informative guides on everything from structural improvements to aesthetic upgrades, empowering homeowners to achieve their ideal living spaces.